8. Advanced Configuration: Contexts, Routing, and YUI
Introduction
The good news is that your application is basically feature complete for the desktop, but we still have some work to do to make it better. In this module, we’re going to update the application-level and mojit-level configuration files. We’ll update the application.json to define a static application name (no more updating the path to the assets), add a new route with parameters for the Mojito dashboard, and configure Mojito to use a different version of YUI. We’ll also cover how to configure logging levels, change the order of the logging levels, or provide logging filters.
As for mojit configuration, we’ll be using the mojit configuration file definition.json to store data that your controller can access. In turn, your controller can pass some of these configuration values to the models to get data. We don’t have to hardcode the REST URIs, OAuth keys, or YQL statements in the models anymore, so the models can basically get data from any given source.
Time Estimate
20 minutes
What We’ll Cover
- using YAML for configuration files
- default configurations and definitions
- using the Config addon to get mojit configurations
- yui object and configurations
- configuring the YUI seed
- using the environment:development context
- adding parameters and using regular expressions in the routing configurations
Final Product
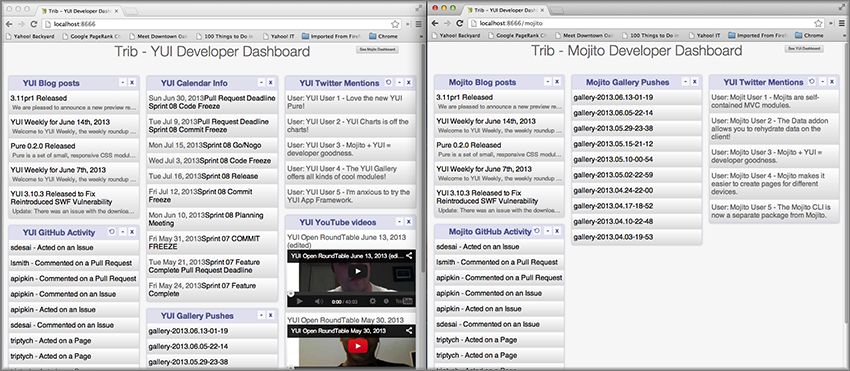
The biggest visible change in the latest version of our application is that it now has a Mojito dashboard as well as a YUI dashboard.
Before Starting
Review of the Last Module
In the last module, we learned how to bind mojit code (binders) to the DOM and use these binders to call controller functions and attach content to the DOM. This involved learning about the following:
- requirements for using binders
- allowing event handlers to attach to the mojit DOM node
- communicating with other mojits on the page
- executing actions on the mojit that the binder is attached to
- refreshing templates with binders
Setting Up
$ cp -r 07_binders 08_adv_config
Lesson: Advanced Configuration
Application Configuration
Using YAML
Mojito also supports configuration files in YAML format (JSON is a subset of YAML). The YAML file extension could be .yaml or .yml. When both the JSON file (e.g., application.json) and the YAML file (e.g., application.yaml) are present, the YAML file is used and a warning is issued. For the data types of the YAML elements, please see the JSON configuration tables in Application Configuration, Routing, and Mojit Configuration.
Our Application Configuration in YAML
If you haven’t worked with YAML before, you’ll be happy to know that YAML supports commenting, which the current JSON schema currently does not support. If your application has both an application.json and an application.yaml, Mojito will use the YAML file. To convert application.json to YAML, you can use a utility such as json2yaml.
# YAML supports commenting, JSON doesn't.
---
- settings:
  - master
  # The application name is statically defined to be `trib`
  staticHandling:
    appName: trib
  # The application is configured to use a specific build of YUI
  # and the logging level is set.
  yui:
    config:
      comboBase: http://yui.yahooapis.com/combo?
      root: 3.8.1/build/
      seed:
      - yui-base
      - loader-base
      - loader-yui3
      - loader-app
      - loader-app-base{langPath}
      debug: true
      logLevel: warn
  # The specs object is where our mojit instances and the
  # parent-child mojit relationships are defined.
  specs:
    tribframe:
      type: HTMLFrameMojit
      config:
        deploy: true
        title: Trib - YUI/Mojito Developer Dashboard
        child:
          type: PageLayout
          config:
            children:
              header:
                type: Header
              body:
                type: Body
                config:
                  children:
                    github:
                      type: Github
                    calendar:
                      type: Calendar
                    twitter:
                      type: Twitter
                    youtube:
                      type: Youtube
                    blog:
                      type: Blog
                    gallery:
                      type: Gallery
              footer:
                type: Footer
        # The assets for the application are specified here and will be attached
        # to the page by the `HTMLFrameMojit`.
        assets:
          top:
            css:
            - http://yui.yahooapis.com/3.9.0/build/cssnormalize/cssnormalize-min.css
            - http://yui.yahooapis.com/gallery-2013.03.13-20-05/build/gallerycss-cssform/gallerycss-cssform-min.css
            - http://yui.yahooapis.com/3.9.0/build/cssgrids-responsive/cssgrids-responsive-min.css
            - http://yui.yahooapis.com/3.9.0/build/cssbutton/cssbutton-min.css
            - http://yui.yahooapis.com/gallery-2013.03.13-20-05/build/gallerycss-csslist/gallerycss-csslist-min.css
            - https://rawgithub.com/tilomitra/yuicss-common/master/ui.css
            - /static/trib/assets/trib.css
# Define selectors for contexts for different devices.
- settings:
  - device:iphone
  selector: iphone
- settings:
  - device:ipad
  selector: ipad
# Use different logging levels and no cache for the development context.
- settings:
  - environment:development
  staticHandling:
    forceUpdate: true
  yui:
    config:
      debug: true
      logLevel: debug
- settings:
  - environment:production
  staticHandling:
    forceUpdate: false
  yui:
    config:
      debug: false
      logLevel: none
Static Application Name
We’ve been having to update the path to the assets for each application because the application name has been changing. Generally, you’re not changing application names, but in a cloud-hosted environment, the application name may be dynamically created, so you’ll want a way to statically define the application name so that the path to your assets is valid.
To statically define assets in Mojito applications, you use the staticHandling object and its property appName. We’re going to use trib for our application name, so add the code below to your application.json.
"staticHandling": {
     "appName": "trib"
   },
Now, update the path to your assets for the last time:
...
  ...
    "assets": {
      "top": {
        "css": [
          ...,
          "/static/trib/assets/trib.css"
        ]
      }
    }
  ...
...
Advanced Routing Configuration
For our application, we’re going to use the params property in our routes to pass URL parameters to our controller, which will be used to determine what template to render. We won’t be using regular expressions or parameterized paths in our application, but for the sake of completeness, we’ll look at how they work.
Adding Parameters
As you can see from the snippet of our app.js shown below, we’re going to have two routing paths. Each path passes a different value for the view_type parameter. The controller can inspect the URL parameters defined here with the Params addon. If the controller sees that the value for the view_type is yui, it will serve the YUI dashboard, and vice versa, if the value for view_type is mojito the template for the Mojito dashboard is rendered.
...
app.get('/', function (req, res, next) {
    req.params.view_type = "yui";
    next();
}, libmojito.dispatch('tribframe.index'));

app.get('/mojito', function (req, res, next) {
    req.params.view_type = "mojito";
    next();
}, libmojito.dispatch('tribframe.index'));
...
Regular Expressions for Paths
The route objects can contain a regex property that allows you to define a regular expression and then use the key as a parameter in the path. In the example below, the regular expression matches a path that starts with one or the numbers followed by an underscore and then the string Mojitos or mojitos:
 [
   {
     "settings": [ "master" ],
    "regex_path": {
      "verbs": ["get"],
      "path": "/:matched_path",
      "regex": { "matched_path": "\d{1,2}_[Mm]ojitos?" },
      "call": "myMojit.index"
    }
  }
]
Using Parameterized Paths
The parameterized paths allow you to have Mojito execute the correct action based on the request. In our example app.js below, if the HTTP request is made on the path /index, the index method of the tribframe instance is executed. Likewise, if the HTTP request is made to /mojito/index, the index method of tribframe instance is made, but the params property has different values. We use the params property to render the right template, but you could use a parameterized URL to call a different mojit action to render the appropriate template.
app.get('/:action', function (req, res, next) {
    req.params.view_type = "yui";
    next();
}, libmojito.dispatch('tribframe.{action}'));
app.get('/mojito/:action', function (req, res, next) {
    req.params.view_type = "mojito";
    next();
}, libmojito.dispatch('tribframe.{action}'));
YUI
YUI configuration in Mojito is done with the yui.config object in application.json. For those familiar with YUI, the yui.config object allows you to configure YUI just as you would with the YUI config Class. Some of the high-level ways to configure YUI would include the following:
- select which YUI modules are included in the YUI seed file
- configure the combo handler to use a CDN
- optimize performance for environments that may have latency issues or have limited CPU power
- limit the loading of certain YUI modules for specific languages
- configure logging
For our application, we’re going to focus on configuring the YUI seed and logging. If you don’t configure the YUI seed, your application will use the YUI bundled with Mojito.
Configuring the YUI Seed
To use YUI in Web pages, you include a small JavaScript file called the YUI seed file. The YUI seed file allows you to load other YUI components on your page. The seed file is added to your Web page by with following <script> tag.
<script src="http://yui.yahooapis.com/3.8.0/build/yui/yui-min.js"></script>
From the URL to the seed file, the YUI library can infer the version of the library that should be used, the filter that you want to use (min, debug or raw), and the CDN that is serving the library.
Seed File in Mojito Applications
As we have said earlier, In Mojito applications, the YUI seed is configured in application.json. Mojito does this for the following reasons:
- The YUI library is bundled with the application using npm, so loading modules is done differently.
- Mojito applications may run as mobile applications that have connectivity issues preventing access to the YUI seed file.
- When applications are started, new YUI modules, part of the Mojito code, and part of the application code are loaded in the same way as the YUI Core modules, so it is difficult to simply include the YUI seed file in a template.
Default Seed File
In general, you don’t need to worry about the YUI default seed because Mojito creates a default configuration for the YUI seed for you. For our application, we want a specific version of YUI, so we’ll need to specify the base version of YUI with the yui object in application.json.
Specifying the YUI Build
The base property specifies the combo URL and version of YUI. The seed property contains the modules that will loaded with the version of the combo URL specified by base.
[
  {
    "settings": [ "master" ],
    "yui":{
      "config": {
        "base": "http://yui.yahooapis.com/3.8.1/build/?",
        "seed": [
          "yui-base",
          "loader-base",
          "loader-yui3",
          "loader-app",
          "loader-app-base{langPath}"
        ]
      }
    },
    "specs": {
      ...
    },
  ...
]
Logging
Logging in Mojito is handled by YUI, so as you would expect, you configure logging in the yui object. Mojito has six default logging levels, which you can set or modify the order of.
Default Settings
The server and client log settings have the following default values:
- debug: true - turns logging on so that messages are displayed in the console.
- logLevel: "debug" - log level filter.
- logLevelOrder: ['debug', 'mojito', 'info', 'warn', 'error', 'none'] - the order in which the log levels are evaluated.
Configuring Logging
We’ve been just using the default logging up until now, but we’re going to configure the logging for production and development and leave the default settings for the master context.
For our production environment, we don’t want any logging messages, so we’re going to set debug to false and logLevel to none:
[
  ...
  {
    "settings": [ "environment:production" ],
    "yui": {
      "config": {
        "debug": false,
        "logLevel": "none"
      }
    },
  ...
  },
  ...
]
On the other hand, we want to make sure that we see all errors for the development environment (i.e., the context environment:development). We set debug to true and the log level to debug, which will show all possible errors.
[
  {
    "settings": [ "environment:development" ],
    "yui": {
      "config": {
        "debug": true,
        "logLevel": "debug"
      }
    },
    ...
  }
]
By default, we’ll want to see warnings and errors, so we’ll set logLevel to warn:
[
  {
    "settings": [ "master" ],
    "yui": {
      "config": {
        "debug": true,
        "logLevel": "warn"
      }
    },
    ...
  }
]
Context Configurations
As we’ve said in past modules, the context is the runtime environment that an application is running in. Your application can use the setting property in configuration files to define the context and its associated configurations. For instance, as we saw in the section on configuring logging, you may want to have different levels of logging for production than for the development environment. The runtime environment could be defined by the device running the application or the regional environment. You may want to have different configurations for the application when it’s running on an iOS device or if your application is being viewed in a region where text is read from right to left. We’re going to discuss the two categories of contexts, how to configure context configurations, and then apply them.
Base Context
The base context is statically set when you start the application by passing the context object to libmojito.extend in app.js as shown below:
libmojito.extend(app, {
    context: {
        runtime: 'server',
        environment: 'development'
    }
});
The base context allows you to test your application in different environments. If you wanted to see how your application would run on an iPhone and in a region where German is spoken, you could pass the following context object to libmojito.extend:
context: {
    runtime: 'server',
    device: 'iphone',
    lang: 'de',
    environment: 'development'
}
When your application receives a request, you won’t be able to change the base context, so Mojito also has a request context that can be applied based on the context of the requestor. Let’s take a look at that next.
Request Context
The request context can be determined by the HTTP headers, such as the User-Agent for the device/OS, or from the query string parameters. Thus, when your application receives the HTTP header below, it will look for the context “device:android”:
HTTP header "User-Agent:Mozilla/5.0 (Linux; U; Android 2.3; en-us)”
The same context could be requested with the query string parameter ?device=android. The language, region, and device/OS contexts can often be extracted from the header files, but for development and production environments or customized contexts, you may need to need to use the query string parameters to request a context.
Mojits
We’ve already looked at the configuration file application.json to create mojit instances and app.js for defining routing paths, but Mojito also has configuration files that mojits can use to store key-value pairs and defaults.
Default Configurations
As you know, the mojit instance definitions can store configurations in the config object. For example, you may want a mojit instance to have specific configuration information, but you may want to define default configurations as well. You define mojit defaults in the defaults.json file. In the example application.json, the twitter instance defines the title:
...
  "twitter": {
    "type":"Twitter"
    "config": {
      "title": "Twitter Feed"
    }
  },
...
We can define the default URL or search query in the defaults.json file of the Twitter. Because the twitter mojit instance does not define the url and query properties explicitly, your application will use the defaults.
[
  {
    "settings": [ "master" ],
    "config": {
       "url" : “http://search.twitter.com/search.json”,
       "query": "YUI"
    }
  }
]
Definitions
The definitions.json file allows your mojit to store and access configurations as well. The key-value pairs in definitions.json has nothing to do with the mojit definition.
For instance, suppose you want to store the possible feed URLs for YouTube videos. In the Youtube mojit, you may want to display different streams of videos for Mojito or YUI. You could have a default or specify one in the config object of the youtube mojit instance, but a better solution may be to have configurations defined in your definitions.json.
In the definitions.json of the Youtube mojit below has a series of possible feeds.
[
  {
    "settings": [ "master" ],
    "yui": {
      "feed_name": "YUI",
      "url": "https://gdata.youtube.com/feeds/base/users/yuilibrary/uploads",
    },
    "mojito": {
      "feed_name": "Mojito",
      "url": "..."
    }
  }
]
Creating the Application
After you have copied the application that you made in the last module (see Setting Up), change into the application 08_adv_config.
We’ve been updating the path to our CSS assets for each application, but now we’re going to define a static application name, so we’ll be able to use the same path to the CSS assets in the future and in hosting environments. Define the static application name with the staticHandling object in the application.json (shown below) and then modify the path to the CSS asset for the last time.
"staticHandling": {
  "appName": "trib"
},
...,
"assets": {
  "top": {
    "css": [
      ...,
      "/static/trib/assets/trib.css"
    ]
  }
}
Let’s also configure out application to use a specific version (overriding the default version used by Mojito) with the yui object as shown below. Notice that we are also changing the default logging to only display warn and error messages.
"yui":{
  "config": {
    "comboBase":"http://yui.yahooapis.com/combo?",
    "root":"3.8.1/build/",
    "seed": [
      "yui-base",
      "loader-base",
      "loader-yui3",
      "loader-app",
      "loader-app-base{langPath}"
    ],
    "debug": true,
    "logLevel": "warn"
  }
}
Add the following logging configuration to the environment:development to display all logging messages and then add the context environment:production with logging configuration to have caching and show no logging messages:
{
    "settings": [ "environment:development" ],
    "staticHandling": {
        "forceUpdate": true
    },
    "yui":{
        "config": {
            "debug": true,
            "logLevel": "debug"
        }
    }
},
{
    "settings": [ "environment:production" ],
    "staticHandling": {
        "forceUpdate": false
    },
    "yui":{
        "config": {
            "debug": false,
            "logLevel": "none"
        }
    }
}
We haven’t touched app.js for a long time. We’re going to add a route to get Mojito data, and add parameters that the controller will use to determine what dashboard to display (YUI or Mojito). Replace the one routing path in app.js with the following just above the listen method:
app.get('/', function (req, res, next) {
    req.params.view_type = "yui";
    next();
}, libmojito.dispatch('tribframe.index'));
app.get('/mojito', function (req, res, next) {
    req.params.view_type = "mojito";
    next();
}, libmojito.dispatch('tribframe.index'));
Great, we’re done with the changes to our application configuration. Now, let’s simplify our mojit code by adding configuration values, starting with the Blog mojit. Replace the contents of definition.json (should be pretty much empty as of now) with the following:
[
  {
    "settings": [ "master" ],
    "mojitotitle" : "Mojito Blog Posts",
    "yuititle" : "YUI Blog Posts",
    "feedURL" : "http://www.yuiblog.com/blog/feed/"
  }
]
The Blog mojit’s controller needs to be modified to use the Config addon to get the configuration values from definition.json. Replace the content of the index method with the following and require the Config and Params addon in the requires array:
index: function (ac) {
  var view_type, feedURL, title;
  view_type = ac.params.getFromRoute('view_type') || "yui";

  if (view_type === "yui") {
    feedURL = ac.config.getDefinition('feedURL', 'notfound');
    title = ac.config.getDefinition('yuititle', 'notitle');
  } else if (view_type === "mojito") {
    feedURL = ac.config.getDefinition('feedURL', 'notfound');
    title = ac.config.getDefinition('mojitotitle', 'notitle');
  }
  ac.models.get('blog').getData({}, feedURL, function (data) {
    // add mojit specific css
    ac.assets.addCss('./index.css');

    // populate blog template
    ac.done({
      title: title,
      results: data
    });
  });
}
We’re going to use the definition.json file to store YQL information as well. For the Gallery mojit, we’re going to get data from the YQL store, which is a cloud storage that YQL can access. We’re going have save the YQL store in mojits/Gallery/definition.json as shown below:
 [
   {
     "settings": [ "master" ],
     "mojitotitle" : "Mojito Gallery Pushes",
     "yuititle" : "YUI Gallery Pushes",
     "yqlTable" : "store://owgYr7PT7CWIOWMaWs9Stb"
   }
]
The Gallery controller will also need to get the configurations with the Config addon, so go ahead and update the index method of the controller with the code below. Also, make sure that you have required the Config and Params addons in the requires array.
index: function (ac) {
  var view_type, tablePath, title;
      view_type = ac.params.getFromRoute('view_type') || "yui";

  if (view_type === "yui") {
    tablePath = ac.config.getDefinition('yqlTable', 'notfound');
    title = ac.config.getDefinition('yuititle', 'notitle');
  } else if (view_type === "mojito") {
    tablePath = ac.config.getDefinition('yqlTable', 'notfound');
    title = ac.config.getDefinition('mojitotitle', 'notitle');
  }
  ac.models.get('gallery').getData({}, tablePath, function (data) {
    // add mojit specific css
    ac.assets.addCss('./index.css');

    // populate youtube template
    ac.done({
      title: title,
      results: data
    });
  });
}
Let’s go ahead and do the same for the Twitter and Github mojits. The definition.json file for the Twitter mojit is going to store your OAuth keys as well. For both mojits, you’re going to determine what dashboard to display (YUI/Mojito) based on the route parameters and then fetch a configuration from definition.json to render the appropriate data.
mojits/Twitter/definition.json
[
  {
    "settings": [ "master" ],
    "mojitotitle" : "Mojito Twitter mentions",
    "yuititle" : "YUI Twitter mentions",
    "yuiquery" : "@yuilibrary",
    "mojitoquery" : "#Mojito yahoo",
    "oauth": {
      "consumer_key": "[your_consumer_key]",
      "consumer_secret": "[your_consumer_secret]",
      "access_token_key": "[your_access_token]",
      "access_token_secret": "[your_access_secret]"
    }
  }
]
mojits/Twitter/controller.server.js
YUI.add('twitter', function (Y, NAME) {

  Y.namespace('mojito.controllers')[NAME] = {

  index: function (ac) {
      var view_type, q, title, oauth_keys=null, count=10;
      view_type = ac.params.getFromRoute('view_type') || "yui";

      if (view_type === "yui") {
          q = ac.config.getDefinition('yuiquery', 'notfound');
          title = ac.config.getDefinition('yuititle', 'notitle');
      } else if (view_type === "mojito") {
          q = ac.config.getDefinition('mojitoquery', 'notfound');
          title = ac.config.getDefinition('mojitotitle', 'notitle');
      }
      // Get Twitter API keys from your developer account (https://dev.twitter.com/apps) and
      // use the `oauth_keys` to hold your consumer key/secret and access token/secret.
      // If you leave `oauth_keys` undefined, your app will just use mocked data.
      // Get OAuth keys from definition.json to get real data.
      // oauth_keys = ac.config.getDefinition('oauth');
      ac.models.get('twitter').getData(count, q, oauth_keys, function (err, data) {
          if (err) {
              ac.error(err);
              return;
          }
          // add mojit specific css
          ac.assets.addCss('./index.css');
          ac.done({
              title: title,
              results: data.statuses
          });
      });
    }
  };
}, '0.0.1', {requires: ['mojito', 'mojito-assets-addon', 'mojito-models-addon', 'mojito-params-addon', 'mojito-config-addon']});
For the Github mojit, you’ll need more information for the YQL table to get GitHub data for Mojito and YUI, so we’ll add the id and repo to the configuration file definition.json:
[
  {
    "settings": [ "master" ],
    "yqlTable" : "store://gpgSGZAwQ3vaDaalPQZ44u",
    "yui": {
      "title" : "YUI GitHub Activity",
      "id": "yui",
      "repo": "yui3"
    },
    "mojito": {
      "title" : "Mojito GitHub Activity",
      "id": "yahoo",
      "repo": "mojito"
    }
  }
]
You’ll need to modify the Github controller and model to pass in the parameters for the YQL keys. Replace the index method in the controller, add the Params and Config addons to the requires array (mojito-params-addon, mojito-config-addon), and then replace the contents of the getData method in the model yql.server.js with the content below:
index: function (ac) {
  var view_type, yqlTable, yui, mojito, title, id, repo, model = ac.models.get('yql');
  view_type = ac.params.getFromRoute('view_type') || "yui";

  if (view_type === "yui") {
    yqlTable = ac.config.getDefinition('yqlTable', '');
    yui = ac.config.getDefinition('yui', 'notitle');
    title = yui.title;
    id = yui.id;
    repo = yui.repo
  } else if (view_type === "mojito") {
    yqlTable = ac.config.getDefinition('yqlTable', '');
    mojito = ac.config.getDefinition('mojito', 'notitle');
    title = mojito.title;
    id = mojito.id;
    repo = mojito.repo
  }
  Y.log(model);
  model.getData({}, yqlTable, id, repo, function (data) {
    Y.log("Github -index - model.getData:");
    Y.log(data);

    // Construct special data
    var res = [];
    Y.log("calling githubmap");
    res = githubMap(ac, data);

    // Add mojit specific CSS
    ac.assets.addCss('./index.css');
    ac.done({
      title: title,
      results: res
    });
  });
}
getData: function (params, yqlTable, id, repo, callback) {
  Y.log(this.config);
  var itemLimit = "10",
      query = "use '{table}' as github.events; select json.type, json.actor, json.payload from github.events where id='{id}' and repo='{repo}' limit {limit}",
      queryParams = {
        table: yqlTable,
        limit: itemLimit,
        id: id,
        repo: repo
      },
  cookedQuery = Y.Lang.sub(query, queryParams);
  Y.YQL(cookedQuery, Y.bind(this.onDataReturn, this, callback));
}
You’ll need to update the tests once again. Here are the updates for both the controller and model tests.
mojits/Github/tests/controller.server-tests.js
YUI.add('github-tests', function (Y) {

  var suite = new YUITest.TestSuite('github-tests'),
      controller = null,
      A = YUITest.Assert,
      config_def = null,
      model;

  suite.add(new YUITest.TestCase({

    name: 'Github user tests',
    setUp: function () {
      controller = Y.mojito.controllers["github"];
      model = Y.mojito.models["stats-model-yql"]
      config_def = {
        "yui": {
          "title" : "YUI GitHub Activity",
          "id": "yui",
          "repo": "yui3"
        },
        "mojito": {
          "title" : "Mojito GitHub Activity",
          "id": "yahoo",
          "repo": "mojito"
        }
      };
    },
    tearDown: function () {
      controller = null;
    },
    'test mojit': function () {
      var ac,
          assetsResults,
          route_param,
          doneResults,
          def_value;
      ac = {
        assets: {
          addCss: function (css) {
            assetsResults = css;
          }
        },
        config: {
          getDefinition: function (key) {
            return config_def[key];
          }
        },
        params: {
          getFromRoute: function (param) {
            route_param = param;
          }
        },
        models: {
          get: function (modelName) {
            A.areEqual('stats-model-yql', modelName, 'wrong model name');
            return {
              getData: function (params, tablePath, id, repo, cb) {
                return {
                  onDataReturn: function (cb, data) {
                    cb(data);
                  }
                };
              }
            };
          }
        },
        done: function (data) {
          console.log(data);
          doneResults = data;
        }
      };
      A.isNotNull(controller);
      A.isFunction(controller.index);
      controller.index(ac);
    }
  }));
  YUITest.TestRunner.add(suite);
}, '0.0.1', {requires: ['mojito-test', 'github', 'stats-model-yql']});
mojits/Github/tests/models/yql.server-tests.js
YUI.add('stats-model-yql-tests', function(Y, NAME) {

  var suite = new YUITest.TestSuite(NAME),
      model = null,
      yqlTable = null,
      id = null,
      repo = null,
      A = YUITest.Assert;
  suite.add(new YUITest.TestCase({
    name: 'stats-model-yql user tests',
    setUp: function() {
      model = Y.mojito.models["stats-model-yql"]
      yqlTable = "store://gpgSGZAwQ3vaDaalPQZ44u";
      id = "yui";
      repo = "yui3";
    },
    tearDown: function() {
      model = null;
    },
    'test mojit model': function() {
      var cfg = { color: 'red' };
      A.isNotNull(model);
      A.isFunction(model.init);
      model.init(cfg);
      A.areSame(cfg, model.config);
      A.isFunction(model.getData);
      model.getData({}, yqlTable, id, repo, function(data) {
        A.isObject(data);
        return data;
      });
    }
  }));
  YUITest.TestRunner.add(suite);
}, '0.0.1', {requires: ['mojito-test', 'stats-model-yql']});
Just one more small change to our child mojits before we work on the composite and frame mojits. The output from our Blog mojit was pretty messy. Just replace the CSS in mojits/Blog/assets/index.css with the code below:
#blog li .desc {
  display:block;
  color: grey;
  font-size: 0.8em;
  text-overflow: ellipsis;
  white-space: nowrap;
  overflow: hidden;
  margin-left: 4px;
  margin-top: 4px;
}
From the screenshot of our application, you can see a button at the top right-hand corner. This button allows the user to either view the YUI or the Mojito dashboard. We are going to add this button to the index template of our PageLayout mojit with the following:
<div id="" class="mojit pageLayout trib" >
  <h1></h1>
  <a class="yui3-button swap" href=""></a>
  <div class="myheader" >

  </div>
  <div class="mybody" >

  </div>
  <div class="myfooter" >

  </div>
</div>
To provide the Handlebars expression with the appropriate value, we’ll need to update the index method of the PageLayout controller and add the Params addon to the requires array as well. The Y.log statement will be used to demonstrate our logging configuration.
index: function(ac) {
  Y.log("PageLayout: this log message won't show in the default context, but will show up in development.","info", NAME);
  var view_type = ac.params.getFromRoute('view_type') || "yui";
  if (view_type === "yui") {
    ac.composite.done({
      title: "Trib - YUI Developer Dashboard",
      button_text: "See Mojito Dashboard",
      other: "/mojito"
    });
  } else if (view_type === "mojito") {
    ac.composite.done({
      title: "Trib - Mojito Developer Dashboard",
      button_text: "See YUI Dashboard",
      other: "/"
    });
  }
}
We’ll need to add a template for the Mojito data to our composite mojit Body and modify the controller so that ac.composite.done is passed the correct template. Create the template mojits/Body/views/mojito.hb.html with the following markup first:
<div id="" class="mojit">
  <h4 class="bodytext"></h4>
  <div class="bodyStuff yui3-g-r">
    <div class="yui3-u-1-3">


    </div>
    <div class="yui3-u-1-3">

    </div>
    <div class="yui3-u-1-3">

    </div>
  <div>
</div>
Update the index method in mojits/Body/controller.server.js with the following so that the correct template is rendered. Also, once again, add the Params addon to the requires array.
index: function (ac) {
  Y.log("Body - controller.server.js index called");

  var view_type = ac.params.getFromRoute('view_type') || "yui";

  if (view_type === "yui") {
    ac.composite.done({
      title: ""
    });
  } else if (view_type === "mojito") {
    ac.composite.done({
      title: ""
    }, {"view": {"name": "mojito"}});
  }
}
That ought to do it for now. We used the configuration in app.js to pass a view (template) name, stored configuration values in definition.json for our mojits, configured our application to have a static name and use a specific version of YUI. Go ahead and start your application and click the button to see the Mojito dashboard for the first time.
Notice from your console that you’re only seeing warning messages. Try restarting the application with the environment:development context (update app.js) to see info log messages as well. You’ll now see the output from Y.log statement in the controller of the PageLayout mojit.
If you want to suppress log messages, just start the application with the environment:production context.
Lastly, because we now have a Mojito dashboard, let’s add a functional test that confirms that the Mojito dashboard has loaded by creating the test file arrow_tests/test_mojito_dashboard.js with the following:
YUI({
  useConsoleOutput: true,
  useBrowserConsole: true,
  logInclude: { TestRunner: true }
}).use('node', 'node-event-simulate', 'test', 'console', function (Y) {

  'use strict';
  var suite = new Y.Test.Suite("TribApp: Mojito Dashboard test"),
      url = window.location.protocol + "//" + window.location.host + "/";
  suite.add(new Y.Test.Case({
    "test Mojito dashboard": function () {
      // Tests the title in HTML header
      Y.Assert.areEqual("Trib - YUI/Mojito Developer Dashboard", Y.one('head title').get('innerHTML'));

      // Tests the  YUI button
      Y.Assert.areEqual(url, Y.one('a.yui3-button.swap').get('href'));

      // Tests the title within the content
      Y.Assert.areEqual("Trib - Mojito Developer Dashboard", Y.one('body h1').get('innerHTML'));
    }
  }));
  Y.Test.Runner.add(suite);
});
Let’s also add the new scenarios that simulate the button click to load the Mojito Dashboard and then re-click the button to get back to the YUI Dashboard by adding the following scenarios to the scenario array in the test descriptor arrow_tests/test_tribapp_descriptor.json:
{
  "controller": "locator",
  "params": {
    "value": "a.yui3-button.swap",
    "click": true
  }
},
{
  "test" : "test_mojito_dashboard.js"
},
{
  "controller": "locator",
  "params": {
    "value": "a.yui3-button.swap",
    "click": true
  }
},
{
  "test" : "test_yui_dashboard.js"
}
Go ahead and run the Arrow tests to confirm that the button does indeed load the the dashboards. If you forgot how to run the Arrow tests, refer to the module 6. Testing in Mojito.
Summary
We covered many different types of configuration in this module. Our short list includes the following:
- YAML application configuration
- statically configuring the name of the application
- base and request contexts
- configuring the YUI seed
- logging configuration
- advanced routing configuration that includes regular expressions and parameters
- default and definition configuration files
Troubleshooting
Error: Invalid or expired token
If your Twitter mojit isn’t rendering a template and you get the following error, your OAuth tokens may be incorrect or your controller is not accessing the keys from definition.json. Check the definition.json file, that you’re requesting the correct key from the the file, and that your OAuth tokens that you got from Twitter are correct and have the proper permissions.
error: (mojito-output-buffer):
{ statusCode: 401,
data: '{"errors":[{"message":"Invalid or expired token","code":89}]}' }
Cannot GET /mojito
If you click on the See Mojito Dashboard and see the following message, you probably haven’t updated the app.js to include a route path for /mojito.
Cannot GET /mojito
Confirm that app.js has the following content:
app.get('/', function (req, res, next) {
    req.params.view_type = "yui";
    next();
}, libmojito.dispatch('tribframe.index'));

app.get('/mojito', function (req, res, next) {
    req.params.view_type = "mojito";
    next();
}, libmojito.dispatch('tribframe.index'));
Q&A
Can YAML be used for other configuration files as well?
Yes, any of the JSON configuration files can be converted to YAML.
Is it possible to have a global definition.json that all mojits can access?
No, it’s not. The definition.json file is for mojit-level configurations.
Do the configurations of the request context override the configurations of the base context?
The configurations of the request and base context are merged. If the request and base context configurations have identical keys, the values of the request context override those of the base context.
What configurations take precedence, those in defaults.json or those in application.json?
If the same properties exist in application.json and defaults.json, the values from application.json are applied. The configurations in defaults.json are used if the same key-value pairs don’t exist in application.json, thus, the name “defaults”.
Test Yourself
Questions
- How do you configure the logging levels for your application?
- What property is used to define the application name?
- How do you set the base context?
- What advantage does YAML configuration files have over JSON configuration files?
- Name two advanced routing features of Mojito.
Additional Exercises
- Convert the mojits/Twitter/definition.json into mojits/Twitter/definition.yaml. Try using a JSON-to-YAML conversion tool.
- Create a new configuration object in application.json that has the context "device:android" that defines the selector android. Then, create the template index.android.html for the Body mojit.
- Modify the app.js file to define a routing path that uses regular expressions to capture any path that has the word “yui” or “YUI” in it.
Terms
- base context
- The context or environment that an application starts in. The base context is specified in the context object that is passed to libmojito.extend in app.js, where libmojito is an instance of mojito: var libmojito = require('mojito');
- request context
- The context of an incoming request or the runtime environment of the client. The Mojito server may receive an HTTP request from an Android device. Mojito will determine the context based on the HTTP Header User-Agent and then apply the proper configurations based on this request context.