Using Multiple Mojits
Time Estimate: 15 minutes
Difficulty Level: Intermediate
Summary
This example shows how to use a parent mojit with multiple child mojits to create an HTML page.
The following topics will be covered:
- configuring the application to use multiple mojits
- including the output from different mojits in one template
- embedding the rendered template into the HTML frame
Tip
To learn how to use the Mojito built-in mojit HTMLFrameMojit to aggregate and display the output from child mojits, see Using the HTML Frame Mojit.
Implementation Notes
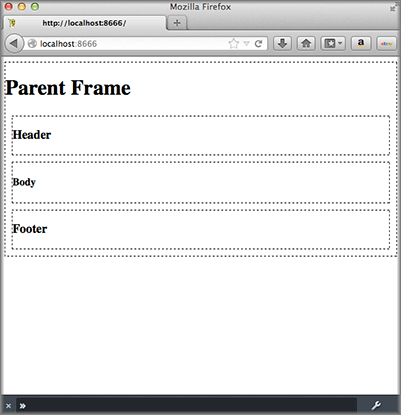
In the screenshot below, you see an HTML page divided into header, body, and footer sections that were created by individual mojits.

In the application.json below that is used for this code example, you see that this application is using the frame instance of type Frame. The Frame forms a skeleton page of div tags that use content created by the child mojits Header, Body, and Footer.
[
  {
    "settings": [ "master" ],
    "specs": {
      "parent": {
        "type": "Frame",
        "config" : {
          "children": {
            "header": {
              "type": "Header"
            },
            "body": {
              "type": "Body"
            },
            "footer": {
              "type": "Footer"
            }
          }
        }
      }
    }
  }
]
In controller.server.js of the Frame, the Composite addon allows the parent mojit to execute the child mojits defined in application.json that we looked at earlier. After the children mojits are executed, the data that is passed to the done method in the children mojits becomes accessible in the index.hb.html template of Frame, which we will take a look at next.
YUI.add('frame', function(Y, NAME) {
  Y.namespace('mojito.controllers')[NAME] = {

    index: function(actionContext) {
        actionContext.composite.done({title: "Parent Frame"});
      }
    };
  }
}, '0.0.1', {requires: ['mojito-composite-addon']});
The index.hb.html template of Framed, shown below, has variables from the children mojits in different div tags. The variables header, body, and footer are in triple braces, which allows you to return unescaped HTML.
<div id="" class="mojit" style="border: dashed black 1px;">
  <h1></h1>
  <div class="header" style="border: dashed black 1px; margin: 10px 10px 10px 10px;">

  </div>
  <div class="body" style="border: dashed black 1px; margin: 10px 10px 10px 10px;">

  </div>
  <div class="footer" style="border: dashed black 1px; margin: 10px 10px 10px 10px;">

  </div>
</div>
Setting Up this Example
To set up and run multiple_mojits:
Create your application.
$ mojito create app multiple_mojits
Change to the application directory.
Create the mojits for the HTML frame, body, header, and footer.
$ mojito create mojit Frame
$ mojito create mojit Body
$ mojito create mojit Header
$ mojito create mojit Footer
To configure your application to use the mojits you created, replace the code in application.json with the following:
[
  {
    "settings": [ "master" ],
    "specs": {
      "frame": {
        "type": "Frame",
        "config": {
          "children": {
            "header": {
              "type": "Header"
            },
            "body": {
              "type": "Body"
            },
            "footer": {
              "type": "Footer"
            }
          }
        }
      }
    }
  }
]
Update your app.js with the following to use Mojito’s middleware, configure routing and the port, and have your application listen for requests:
'use strict';

var debug = require('debug')('app'),
    express = require('express'),
    libmojito = require('mojito'),
    app;

    app = express();
    app.set('port', process.env.PORT || 8666);
    libmojito.extend(app);

    app.use(libmojito.middleware());

    app.get('/status', function (req, res) {
        res.send('200 OK');
    });
    app.get('/', libmojito.dispatch('parent.index'));

    app.listen(app.get('port'), function () {
        debug('Server listening on port ' + app.get('port') + ' ' +
        'in ' + app.get('env') + ' mode');
    });
    module.exports = app;
Confirm that your package.json has the correct dependencies as show below. If not, update package.json.
"dependencies": {
    "debug": "*",
     "mojito": "~0.9.0"
},
"devDependencies": {
    "mojito-cli": ">= 0.2.0"
},
From the application directory, install the application dependencies:
$ npm install
Change to mojits/Frame.
To allow the Frame to execute its child mojits, replace the code in controller.server.js with the following:
YUI.add('frame', function(Y, NAME) {
  Y.namespace('mojito.controllers')[NAME] = {

    index: function(actionContext) {
        actionContext.composite.done({title: "Parent Frame"});
    }
  };
}, '0.0.1', {requires: ['mojito-composite-addon']});
Modify the default template to use Handlebars expressions from the child mojits by replacing the code in views/index.hb.html with the following:
<div id="" class="mojit" style="border: dashed black 1px;">
  <h1></h1>
  <div class="header" style="border: dashed black 1px; margin: 10px 10px 10px 10px;">

  </div>
  <div class="body" style="border: dashed black 1px; margin: 10px 10px 10px 10px;">

  </div>
  <div class="footer" style="border: dashed black 1px; margin: 10px 10px 10px 10px;">

  </div>
</div>
Change to Header directory.
$ cd ../Header
Replace the code in controller.server.js with the following:
YUI.add('header', function(Y, NAME) {
  Y.namespace('mojito.controllers')[NAME] = {

    index: function(actionContext) {
      actionContext.done({title: "Header"});
    }
  };
}, '0.0.1', {requires: []});
The done method will make its parameters available to the template.
Replace the code in views/index.hb.html with the following:
<div id="" class="mojit">
  <h3></h3>
</div>
This HTML fragment will be included in the header section of the default template of Frame.
Change to Body directory.
$ cd ../Body
Replace the code in controller.server.js with the following:
YUI.add('body', function(Y, NAME) {
  Y.namespace('mojito.controllers')[NAME] = {

    index: function(actionContext) {
      actionContext.done({title: "Body"});
    }
  };
}, '0.0.1', {requires: []});
Replace the code in views/index.hb.html with the following:
<div id="" class="mojit">
  <h4></h4>
</div>
This HTML fragment will be included in the body section of the default template of Frame.
Change to the Footer directory.
$ cd ../Footer
Replace the code in controller.server.js with the following:
YUI.add('footer', function(Y, NAME) {
  Y.namespace('mojito.controllers')[NAME] = {

    index: function(actionContext) {
      actionContext.done({title: "Footer"});
    }
  };
}, '0.0.1', {requires: ['mojito']});
Replace the code in views/index.hb.html with the following:
<div id="" class="mojit">
  <h3></h3>
</div>
This HTML fragment will be included in the footer section of the default template of Frame.
From the application directory, run the server.
$ node app.js
To view your application, go to the URL: