Sign In With Yahoo
Sign In With Yahoo is an easy, convenient way for your users to create an account and sign into your web or mobile app. Whether you’re a retailer looking to better engage your customers or a publisher looking to boost monetization, Sign In With Yahoo can help you enhance your user experience and derive more value from your traffic.
Build trust with your user base
Give users the peace of mind of knowing that their identity is managed by a trusted provider that respects consumer privacy and choice when they see the Sign In With Yahoo button on your login page.
Boost user account creation
Users can quickly and easily create an account in your web app using their Yahoo credentials without needing to fill out a registration form and remember a new password. This convenient experience can help lift your conversion rate.
Increase logged in traffic
Users already signed into their Yahoo account in the same browser session can sign in with one click. Advanced account recovery services help ensure that your users don’t get locked out of their account.
Re-engage your users
Reach 148 million U.S. users with a validated email address from the second largest U.S. email provider. Improve newsletter open rates with the new subscriptions and shopping-focused Yahoo Mail app.
Enable personalized experiences and higher quality interactions
Personalized experiences are more engaging and lead to higher retention. Sign In With Yahoo lets you access user profile information to create more relevant content and ad experiences for your users. When users authorize your app to access their data, your app gets access to their real identity. Apps based on real identity often have less spam and foster higher quality user interactions.
Enhance your existing account system
Sign In With Yahoo complements your existing account system by giving users the option to sign in with their Yahoo account alongside email or other social login options. When an email address you get from Sign In With Yahoo matches one already in your system, you can sign that user into their existing account without additional passwords.
Maximize your monetization of ads inventory
Improve match rates for logged in users with advertising identity products such as Yahoo ConnectID.
Sign In With Yahoo is a secure and convenient way for users to create an account and sign into your web or mobile app. It can be used to enable the following experiences:
User Account Creation (Registration)
Let users quickly and easily create an account in your web app without needing to fill out a registration form and remember a new password. This convenient experience can help lift your conversion rate.
User Sign In (Authentication)
Let users easily sign into your web app by entering their Yahoo account credentials. If they are already signed into their Yahoo account in the same browser session, they can sign in with one click.
Private User Data Access Management (Authorization)
Request permissions to access your users’ private data, which may include a validated email address to reengage them at a later date.
Token Lifecycle Management for Yahoo APIs
Sign In With Yahoo manages the OAuth 2.0 token lifecycle, simplifying your integration with Yahoo APIs.
Personalization
Personalized experiences are more engaging and lead to higher retention. Sign In With Yahoo lets you access user information which could be arduous to collect via your own registration form.
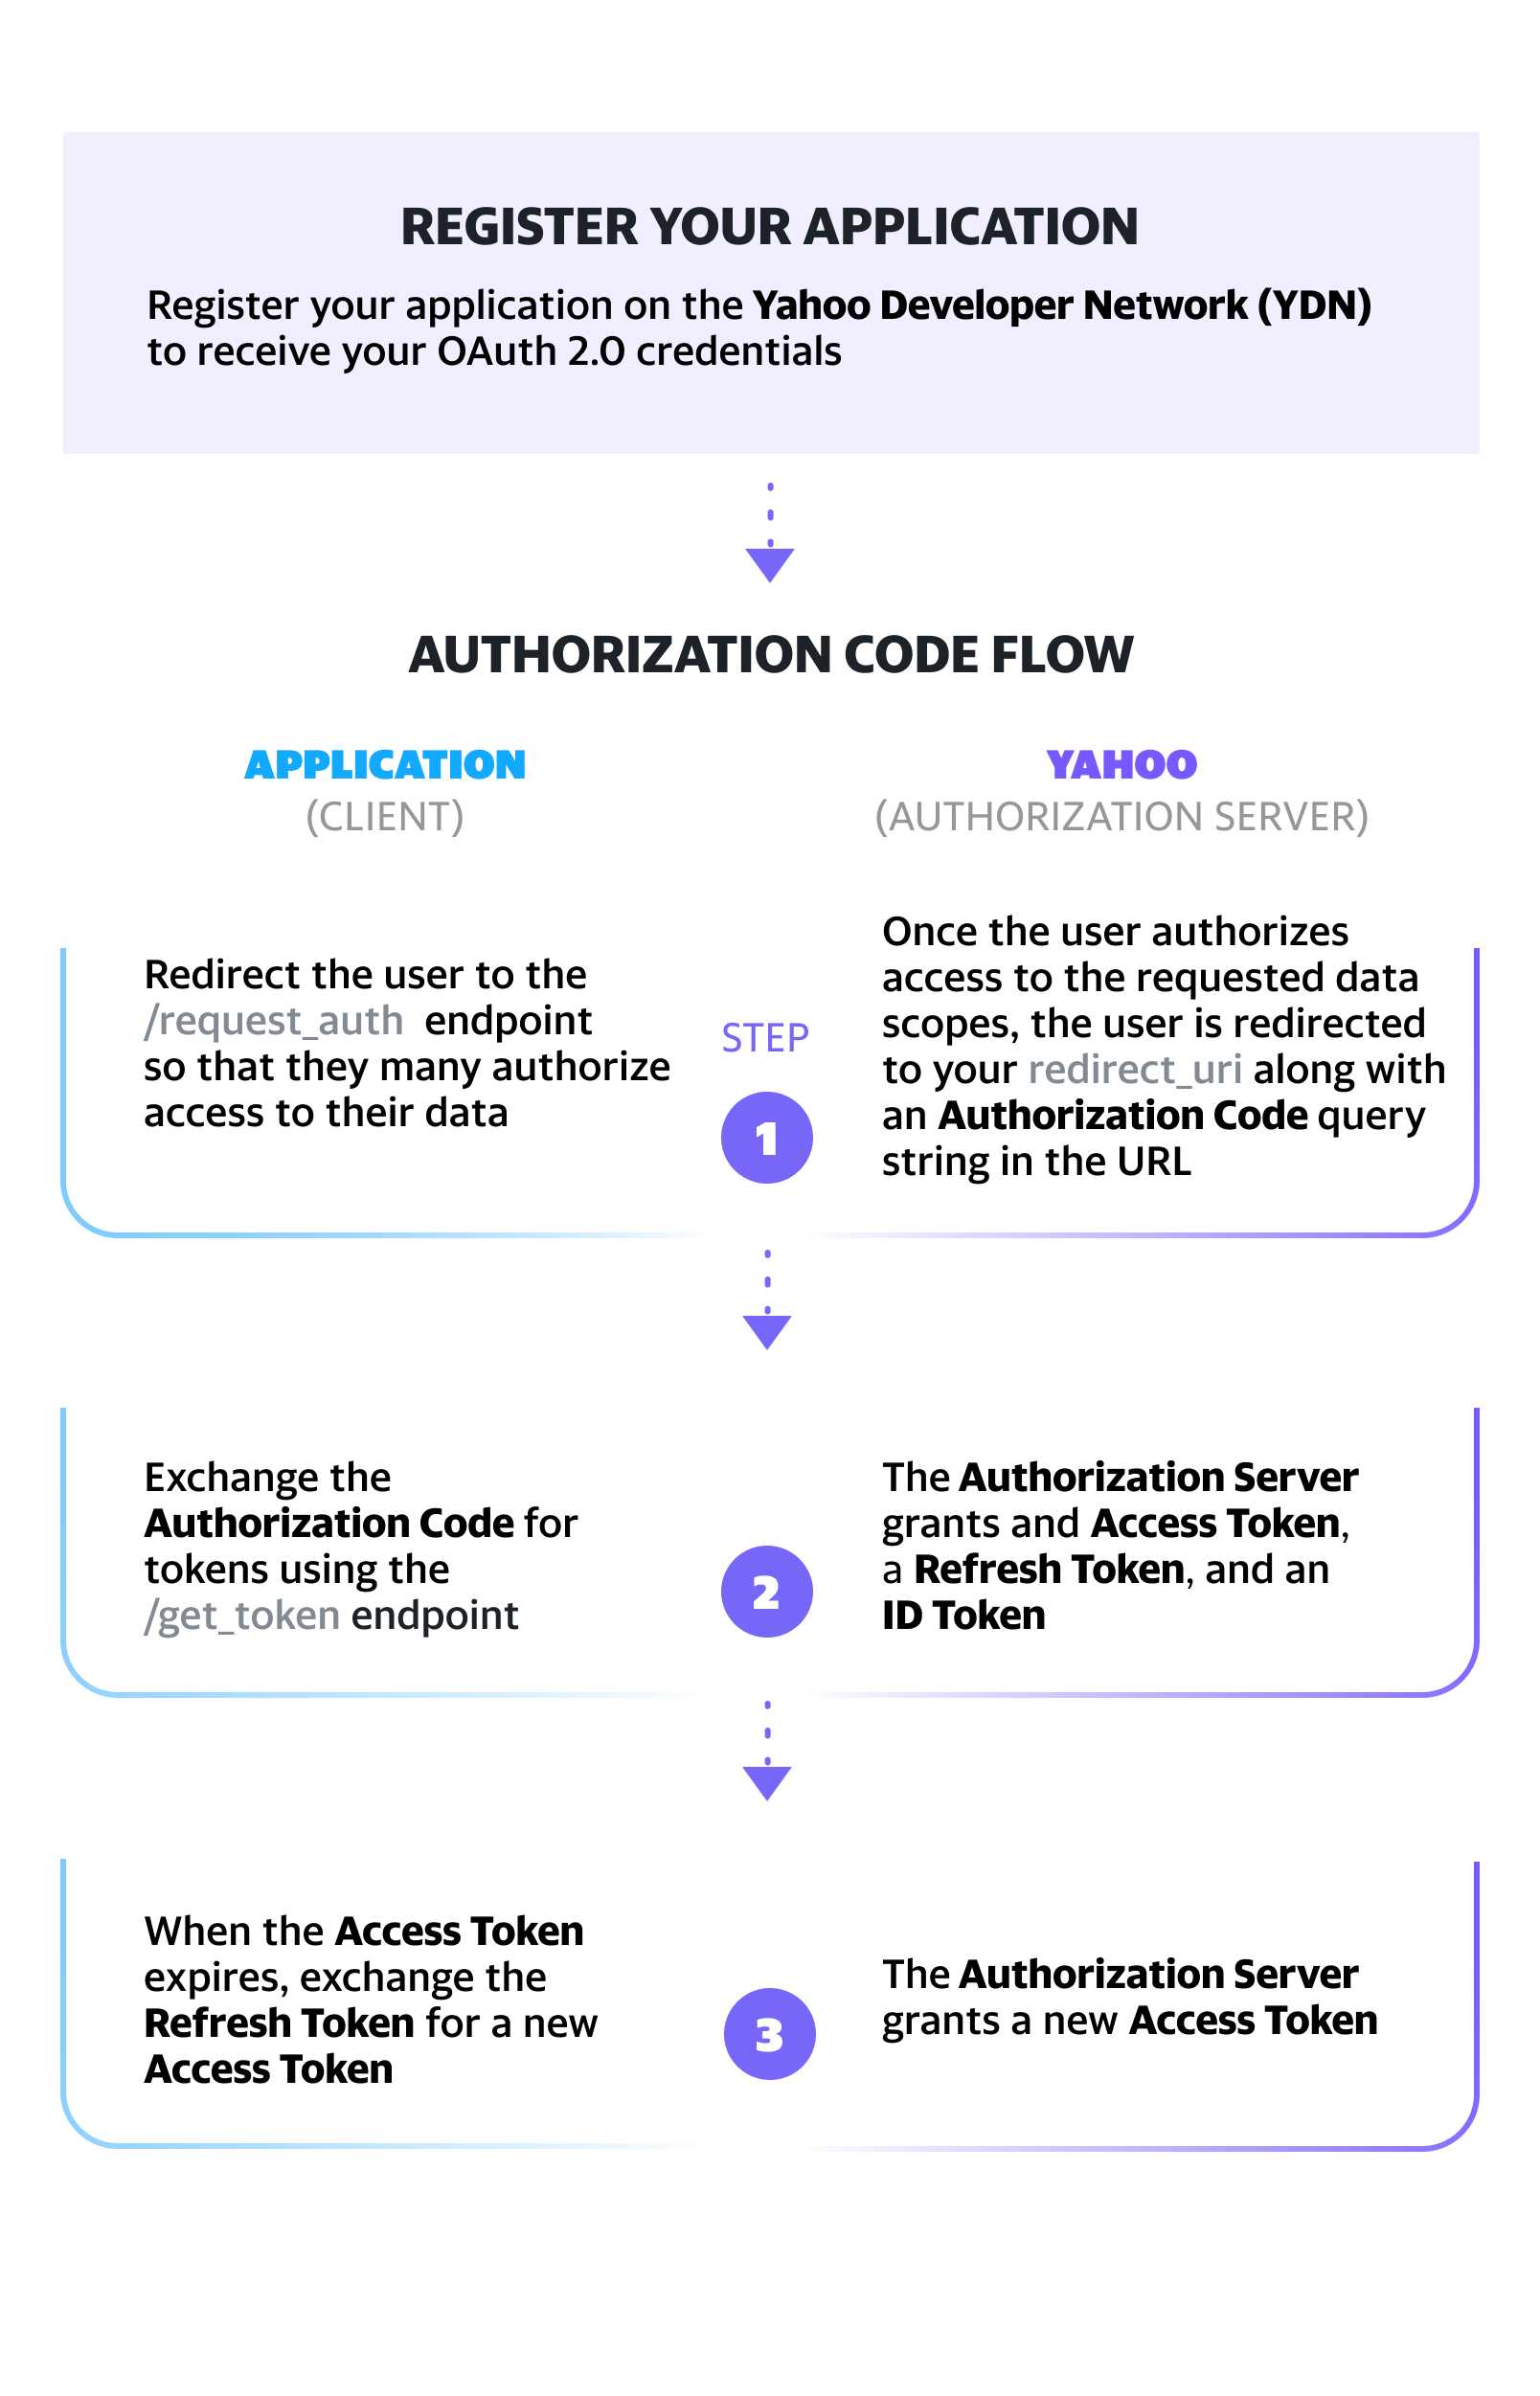
This guide provides step-by-step instructions for integrating Sign In With Yahoo to your website:
- Step 1. Register your application on the Yahoo Developer Network (YDN) to receive your OAuth 2.0 credentials.
- Step 2. Redirect the user to the
/request_authendpoint so that they may authorize access to their data.- Note: After successful authentication and authorization, Yahoo redirects the user back to your application’s
redirect_uri, passing an Authorization Code as a query parameter.
- Note: After successful authentication and authorization, Yahoo redirects the user back to your application’s
- Step 3. Exchange the Authorization Code for an Access Token, Refresh Token and ID Token using the
/get_tokenendpoint.- Note: The ID Token can be decoded to access most claims for either the
profileoremailOpenID Connect scopes. To access additional claims or to fetch updated user information, use the Get User Info API.
- Note: The ID Token can be decoded to access most claims for either the
- Step 4. When the Access Token expires, exchange the Refresh Token for a new Access Token.


Note: Developers who would like access to restricted scopes (mail, contacts, calendar) must follow the instructions on the Developer Access page.
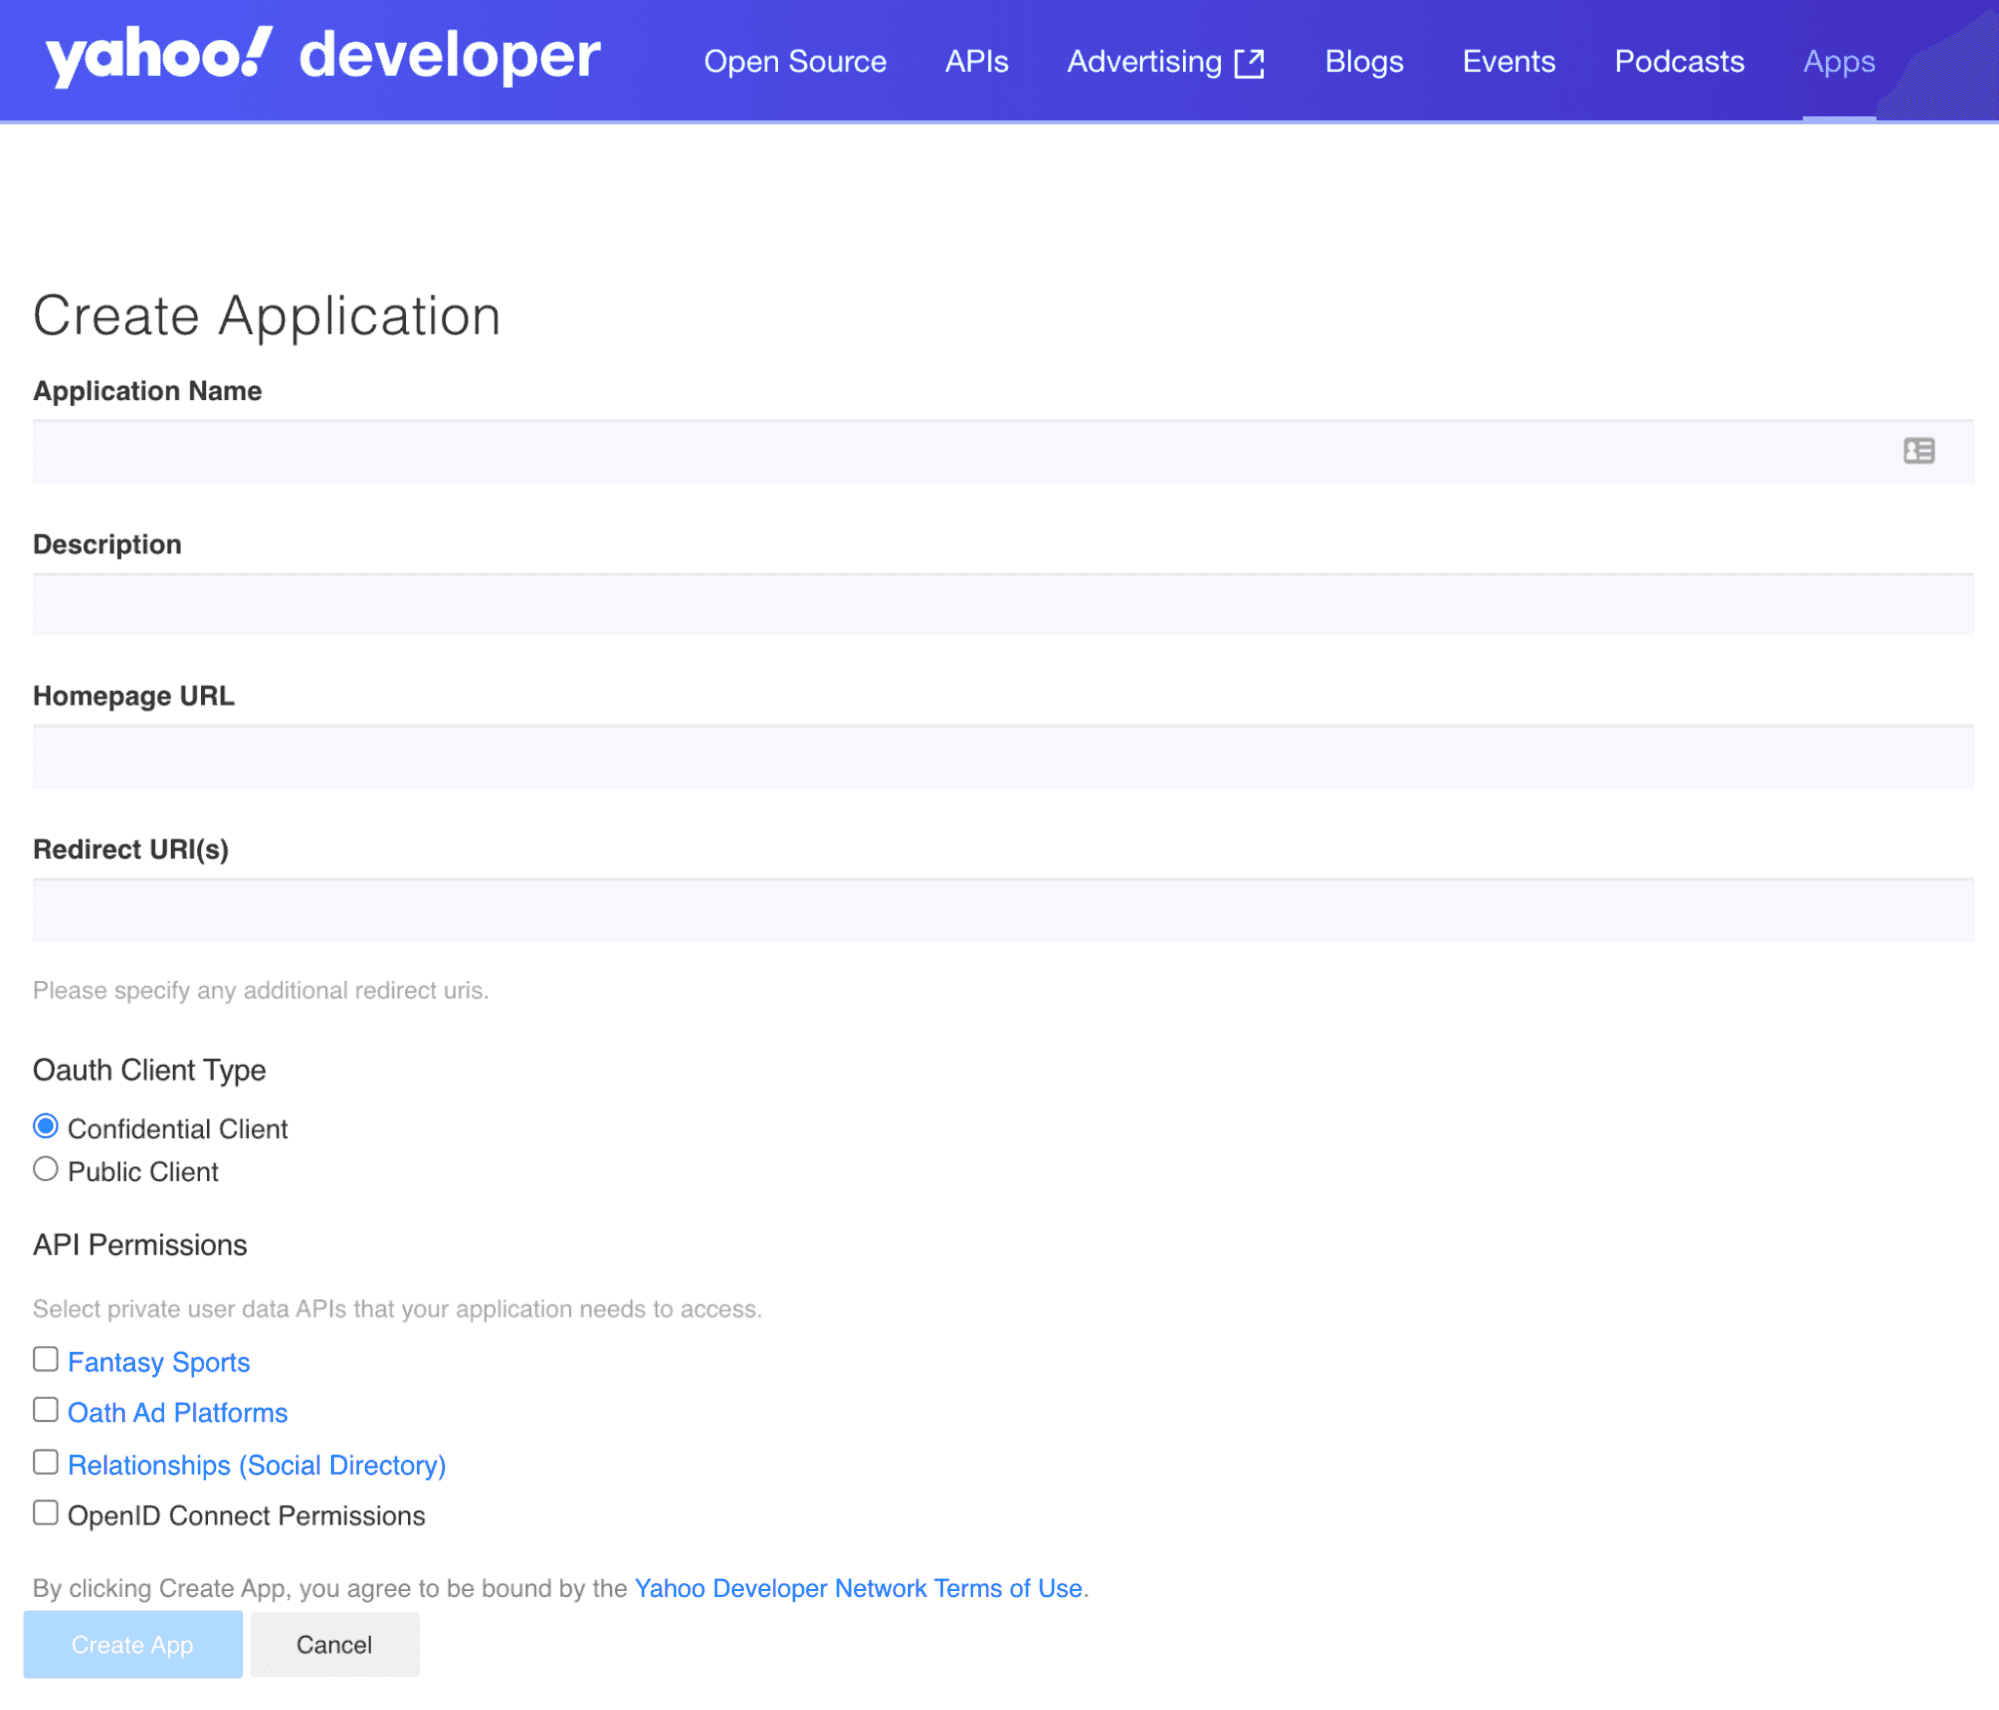
- You’ll need to create a Yahoo account to set up applications on the Yahoo Developer Network (YDN).
- After you have a Yahoo account, create an application to get your Client ID (Consumer Key) and Client Secret (Consumer Secret) for later use in the OAuth 2.0 flow.
- In the Create Application form, provide an application name and a callback domain (redirect URI). Yahoo will redirect your users to this URI after they authorize access to their data, so you’ll want to be the domain owner.
- If your application needs to access private user data from Yahoo APIs, you’ll need to request permissions in the API Permissions checklist. To request access to user profile information, check the Profile option under OpenID Connect Permissions. When your app requires a user email address, also check the Email option.
- At this point, you should identify your client type. Since traditional, multi-page web applications run in an environment that is controlled by the application owner, they can protect a client secret and are therefore considered confidential clients. On the other hand, mobile apps, native desktop apps, and single-page applications (SPAs) cannot protect a client secret, and are therefore considered public clients. When implementing the Authorization Code Flow in later steps, the PKCE extension is strongly recommended for confidential clients and required for public clients. For more information on the PKCE extension, click here.
- Finish creating your application by clicking Create App.


Tip: You can always go to My Apps to view your applications and OAuth 2.0 credentials.
/request_auth endpoint so that they may authorize access to their data.After you’ve created your application, you’ll be given a Consumer Key and Consumer Secret. You’ll use the Consumer Key as the client_id and the callback domain you provided as the redirect_uri.
To create an authorization request, you’ll need Yahoo’s OAuth 2.0 authorization endpoint, a supported HTTP method, and the request parameters given below. Be sure to use the request parameter response_type=code to receive an ID Token, an Access Token, and a Refresh Token in Step 3.
OAuth 2.0 Authorization Endpoint:https://api.login.yahoo.com/oauth2/request_auth
Supported HTTP Methods: GET, POST
The request parameters below can either be transmitted in the request body using POST or as part of the query string with GET.
| Request Parameters | Description |
|---|---|
client.id | (Required) The Client ID (Consumer Key) provided to you when you created your application. |
redirect_uri | (Required) Yahoo redirects users to this URL after they agree to use SSO and authorize access to their private data. Provide the complete URL including the HTTP/HTTPS protocol. If the user should not be redirected to your server, specify the callback as oob (out of band). |
response_type | (Required) For the Authorization Code Flow, you must use code. |
scope | (Required for OpenID Connect) To get an ID Token to authenticate a user, you are required to specify the scope identifier openid. For example: scope=openidAdditionally, to access private user data from the Yahoo APIs, include the relevant API scope identifiers. The scopes can be delimited by a space or comma. In the example below, the scope identifier is specified for requesting the ID Token and an Access Token that provides read access to the Yahoo Mail API:
|
code_challenge | (Required if implementing the PKCE extension) Base64-URL-encoded hash of the code verifier, an alphanumeric string of characters with a minimum length of 43 characters and a maximum length of 128 characters that needs to be dynamically generated by the client when implementing the PKCE extension. |
code_challenge_method | (Required if implementing the PKCE extension) Method type used to generate the code challenge (e.g., S256). |
state | (Recommended) Create a unique session token to maintain state between the request and the callback. By cryptographically binding the value of this parameter to a browser cookie, you can mitigate cross-site request forgery (CSRF, XSRF). |
language | (Optional) Language identifier. The default value is en-us. |
nonce | (Required) An arbitrary URL-safe string used to associate your client session with an ID Token and to mitigate replay attacks. The value is passed through unmodified from the Authentication Request to the ID Token. See Nonce Notes for more information. |
prompt | (Optional) A string value specifying whether Yahoo prompts the user for re-authentication or consent. To prompt the user to re-authorize your application, include prompt=consent in the request. The Yahoo Consent Screen will then be displayed every time the user signs in to your application. To prompt the user to re-authenticate to Yahoo, include prompt=login in the request.This parameter can be used to make sure that the user is still present for the current session or to bring attention to the request. |
max_age | (Optional) You can specify the allowable elapsed time in seconds since the last time the user was actively authenticated by Yahoo. If the elapsed time is greater than this value, Yahoo will attempt to actively re-authenticate the user. |
Sample /request_auth URL:
https://api.login.yahoo.com/oauth2/request_auth?client_id=dj0yJmk9WGx0QlE0UWdCa0hKJmQ9WVdrOWNrNUhXVnBhTkhFbWNHbzlNQS0tJnM9Y29uc3VtZXJzZWNyZXQmeD01OA--&response_type=code&redirect_uri=https://yahoo.com&scope=openid%20mail-r&nonce=YihsFwGKgt3KJUh6tPs2
Note: In the authorization code flow, you will only need to reauthorize access from the user in the future if the user revokes access through Yahoo account settings.
Once the user authenticates, they will be presented with the Yahoo Consent Screen shown below. From the Yahoo Consent Screen, the user will be able to view the permissions you are requesting and either agree or disagree to grant those permissions.


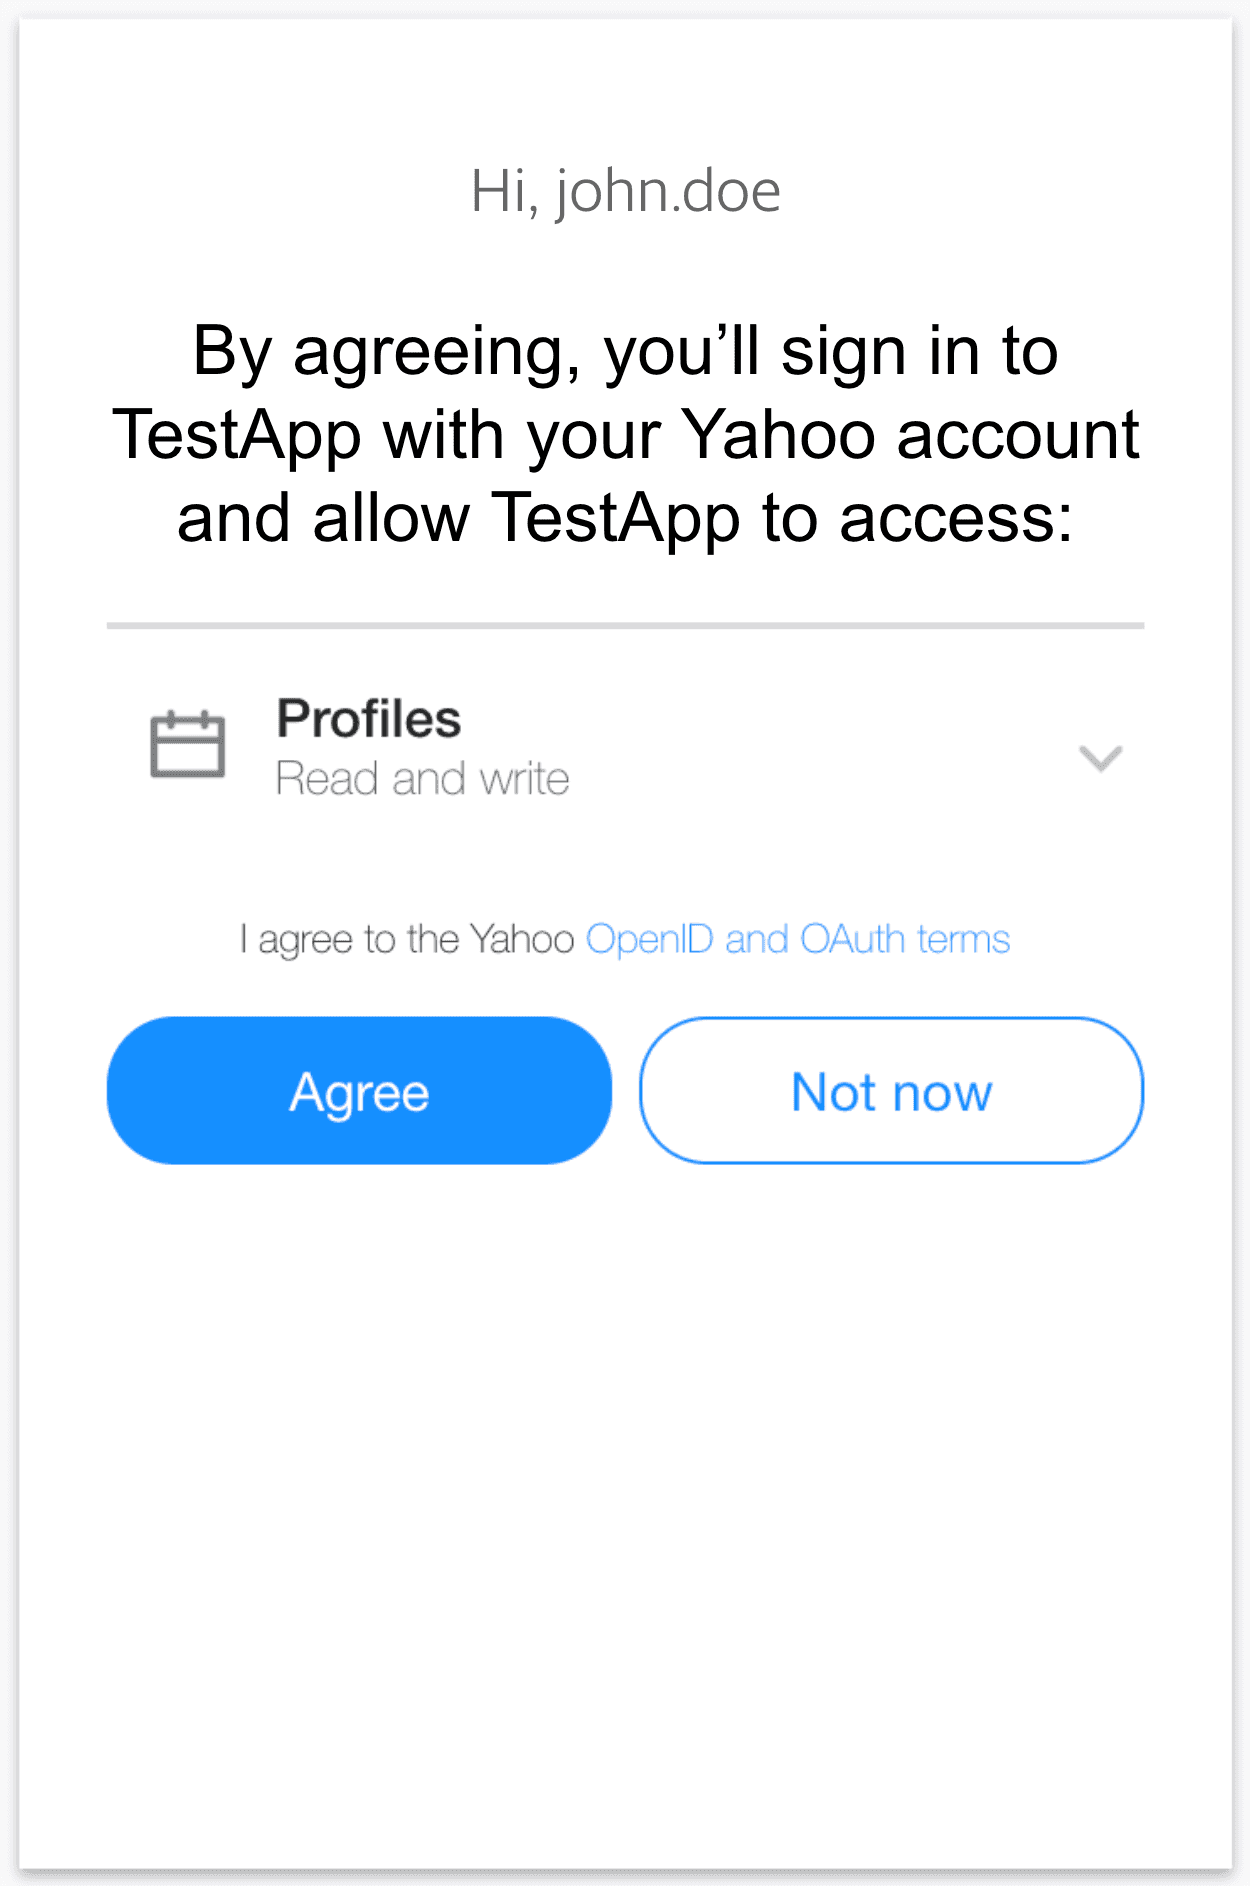
If the user denies access to their data by clicking “Not now”, Yahoo will still redirect them to your redirect_uri, but instead of getting an Authorization Code, you will get the query string parameter error=access_denied. Your application should programmatically handle the case where the user denies access to their private data and act accordingly. If you specified oob for the redirect_uri, if the user clicks “Not now”, Yahoo will attempt to close the Yahoo Consent Screen dialog box.
/get_token endpoint.Once the user authorizes access, they are redirected back to the redirect_uri you originally specified. The authorization code that you’ll exchange for the Access Token, Refresh Token and ID Token is returned as a query string.
In the example below, the authorization code code=x2tzunc is returned as a query string parameter:
https://www.example.com/callback?code=x2tzunc&state=XYZ
Your client needs to extract the authorization code and exchange it for an access token using a call to the /get_token endpoint. The response also contains the refresh token, which persists even when the user changes passwords. The authorization server may issue a new refresh token, in which case the client must discard the old refresh token and replace it with the new refresh token. The authorization server will revoke the old refresh token after issuing a new refresh token to the client. The refresh token can also be invalidated if the user revokes access through Yahoo account settings.
OAuth 2.0 Token Endpoint: https://api.login.yahoo.com/oauth2/get_token
Supported HTTP Methods: POST
The request parameters below are transmitted using HTTP POST in the request body. You can, however, also send the parameters client_id and client_secret in the HTTP Headers instead.
| Request Parameters | Description |
|---|---|
client_id | (Required) The Client ID (Consumer Key) provided to you when you created your application. |
client_secret | (Required for confidential clients without PKCE extension, optional for confidential clients with PKCE extension, omit for public clients) Consumer Secret provided to you when you created your application. |
redirect_uri | (Required) Provide the same complete URL (including the HTTP/HTTPS protocol) given when requesting the authorization URL or the value oob if oob was passed to obtain the authorization URL. The redirect_uri is used solely as a security check as specified in RFC 6749. |
code | (Required) The authorization code appended to redirect_uri as a query string parameter. |
grant_type | (Required) Must contain the string authorization_code grant type. |
code_verifier | (Required if implementing the PKCE extension) A cryptographically random base64-URL-encoded alphanumeric string of characters with a minimum length of 43 characters and a maximum length of 128 characters. Must be dynamically generated by the client, and is used to generate the code_challenge in Step 2. |
Sending Parameters in the HTTP Header and Request Body
When using HTTP Basic authentication, encode the string client_id:client_secret with Base64 scheme per RFC 2617. You can use https://www.base64encode.org/ to encode the authorization header.
Header
Content-Type: application/x-www-form-urlencoded
Authorization:Basic ZGoweUptazlhVmhuVVd0d1REUm5abko2Sm1ROVdWZEthbHBIVm0xaFFTMHRKbk05WTI5dWMzVnRaWEp6WldOeVpYUW1lRDA1TWctLTowOWVkNDU2ZjkyODY4MjAwOWI1MTMyMzcyYTBiZWVkZTM5YzgyZmEz
Request Body
grant_type=authorization_code&redirect_uri=https://www.example.com&code=x2tzunc
Sending Parameters in the Request Body
When sending the parameters in the request body, you need to provide both the Client ID (client_id) and the Client Secret (client_secret) as shown below:
code=x2tzunc&grant_type=authorization_code&client_id=dj2yJmk9aEdiU1VRODg5RUk0JmQ9WVdrOVpITTNZbXgyTjJjbWNHbzlNQS0tJnM9Y29uc3VtZXJzZWNyZXQmeD0zYg--&client_secret=b7dec9d002316dda9a83d4fccd5a95d1329d3b5a&redirect_uri=https://www.example.com
Response Body
A successful response contains JSON with the following fields:
| Fields | Description |
|---|---|
access_token | The Access Token that you can use to make requests for Yahoo user data. The access token has a 1-hour lifetime. |
id_token | A JWT digitally signed by Yahoo that contains identity information about the user. |
expires_in | The Access Token lifetime in seconds. |
token_type | Identifies the type of token returned. At this time, this field always has the value Bearer. |
refresh_token | The Refresh Token that you can use to acquire a new Access Token after the current one expires. For details on how, see Refreshing an Access Token in RFC 6749. |
xoauth_yahoo_guid | The GUID of the Yahoo user. |
Example Response
{"access_token":"UNQO1djO5xpaKm3_KbECBKB5mlFr6tSZTOLrrJCprtT1X1UFljpxiS5iSue8u_n8ah1WbL6sTNw3HPFHicyXDbTs7aSrbIe.rx9n9dzX7xZjx8dyF2Ap1a6J_nw4k56a5mCOuTd.ZFQENgGtHwM0DRFVeDNTAx_WzhqDGPCqhtsNICuuY30soFZGS11FTlUk7Gy0ISjxLRAjIZVtpojnY5p8XuT1qUtAheWqZegJ_7t.AP4o0J4xJ3_oocXeiSKEXaD3AijdBdViKPZI3Ow7yeHK8uX1weNfKoSP6eEpCviyj0YlRMIBSg4cRdGL6EsSggX6B5gzgcA9efDSpcwVhupY0RlUdi.AxJ1nT0frWmrYiwntpu1XP_5mIbOlb4wfrD_ZCRNY2Qby40RBt5iHERSJ89K1o69fw3Jd4C3hF14iJLHcDHmnYJSX651G9MlpGPWT99DRteCdhSm8URbZqfGPG8mZtLpmhfxr1umCoGEgocrfHpITMjOyEwvgmAhgjGKXugvdNTABn0AEQBetIVtJ80Ymbn6IMq_Qh10vyspVsVK69C9yTlwLtZhcvim5Nk_15JHd0GSj0Mj.X.FWTzUK1e3CNQjeJxdQ2Qk9BXDC4_DXW_Ot5LzYy5qRvRKT4gh54n5aBROxFdky0ELt1IgkLTRJ0idUCen87klP.0CLp1QTNXx99N6nM9c_HwWVKwhILUjzXaIrP0GVEMwlGIHqn2I91Z03irBgzrMB219lqUAuF27_OD4QnyQfICSW65n5hVo1e89xwN6VN3usRrhHmdDfd7nk3nzMyXdsOPzghA1huBCYyEGZ_kq9FzVFQ5QYDmJ0WqpmG1yXDEntYVvkB_i_jkbNPH4.R134ptwznCZSuQ--", "refresh_token":"AJj.Dlbt_e4XN85buQhFXj77sIB3lqBF3Bcqb2kwUEoYrBb0Pg--", "expires_in":3600, "token_type":"bearer", "xoauth_yahoo_guid":"UQIDWJNWVNQD4GXZ5NGMZUSTQ4", "id_token":"eyJhbGciOiJFUzI1NiIsImtpZCI6IjM0NjZkNTFmN2RkMGM3ODA1NjU2ODhjMTgzOTIxODE2YzQ1ODg5YWQifQ.eyJhdF9oYXNoIjoiYWM5YkR3ejVMWjl5UEVpdWtEcGdzdz09Iiwic3ViIjoiVVFJRFdKTldWTlFENEdYWjVOR01aVVNUUTQiLCJhdWQiOiJkajB5Sm1rOVdHeDBRbEUwVVdkQ2EwaEtKbVE5V1Zkck9XTnJOVWhYVm5CaFRraEZiV05IYnpsTlFTMHRKbk05WTI5dWMzVnRaWEp6WldOeVpYUW1lRDAxT0EtLSIsImlzcyI6Imh0dHBzOi8vbG9naW4ueWFob28uY29tIiwiZXhwIjoxNDQzODI3MTMwLCJub25jZSI6IjEyMzQ1IiwiaWF0IjoxNDQzODIzNTMwfQ.n7oEFi5028StcI41Hkh6lLYK4PmF7pT4AIXrQ_62nfDEZj2g0oYjSLFPJp4IqF6LefwcCQ9FHT5X9eC8A7peqw"}
Token Endpoint Errors
If your request to the token endpoint fails, the returned JSON will contain an error field providing a succinct cause of the error and an error_description field providing the details of the error.
In the example error response below, the error field indicates that the request was invalid, and the error_description field explains that the refresh_token parameter cannot be empty:
"error_description": "refresh token parameter cannot be empty for refresh_token grant type", "error": "invalid_request"{
Accessing User Information
You should store the Refresh Token for future use, as you will need to provide the Refresh Token to get a new Access Token when it expires. The ID Token can be decoded to access claims for both the profile and email scopes. To fetch updated claims, use the Get User Info API.
After the Access Token expires, you can use the Refresh Token, which has a long lifetime, to get a new Access Token.
URL: https://api.login.yahoo.com/oauth2/get_token
Method: POST
| Request Parameters | Description |
|---|---|
client_id | The Consumer Key provided to you when you created your application. |
client_secret | (Required for confidential clients without PKCE extension, optional for confidential clients with PKCE extension, omit for public clients) The Consumer Secret provided to you when you created your application. |
redirect_uri | Yahoo redirects Users to this URL after they authorize access to their private data. If your application does not have access to a browser, you must specify the callback as oob (out of band). |
refresh_token | The Refresh Token that you originally received along with the Access Token. |
grant_type | Must contain the refresh_token grant type. |
Sample Request Header
Authorization: Basic ZGoweUptazlhazVJWjJ4NVdtTnNhSHA2Sm1ROVdWZHJPVk5xUWtKVU1uUllUakpyYldOSGJ6bE5RUzB0Sm5NOVkyOXVjM1Z0WlhKelpXTnlaWFFtZUQxaFlRLS06NmYzYjI5NjllYzUwOTkxNDM4MDdiNDU4ZTU5MTc5MzFmYmEzMWUwOA==
Content-Type: application/x-www-form-urlencoded
Sample Request Body
grant_type=refresh_token&redirect_uri=https%3A%2F%2Fwww.example.com&refresh_token=a_qOmByVGTm
A successful response contains JSON with the following fields:
| Fields | Description |
|---|---|
access_token | The access token that you can use to make calls for Yahoo user data. The access token has a 1-hour lifetime. |
token_type | The access token that you can use to make calls for Yahoo user data. |
expires_in | The access token lifetime in seconds. |
refresh_token | The refresh token that you can use to acquire a new access token after the current one expires. |
xoauth_yahoo_guid | The GUID of the Yahoo user. (This claim is deprecated. If you need the user’s GUID value, please use the OpenID Connect flows. The GUID will be provided in the id_token.) |
Example Response
{ "access_token":"Jzxbkqqcvjqik2IMxGFEE1cuaos--", "token_type":"bearer", "expires_in":3600, "refresh_token":"AOiRUlJn_qOmByVGTmUpwcMKW3XDcipToOoHx2wRoyLgJC_RFlA-", "xoauth_yahoo_guid":"JT4FACLQZI2OCE" }
Android Example
This reference provides code samples for implementing the Sign In With Yahoo Authorization Code Flow for your Android mobile application.
Table of Contents
- Add the necessary build dependencies to your app’s build.gradle file
- Create the authorization request
- Add RedirectReceiverActivity to your app’s AndroidManifest.xml file
- Perform the authorization request
- Handle the authorization response and request an access token
- Call the Get User Info API to fetch user information
1. Add the necessary build dependencies to your app’s build.gradle file
implementation 'net.openid:appauth:0.8.1'
implementation 'com.squareup.okhttp3:okhttp:4.9.0'
2. Create the authorization request
Create an AuthorizationServiceConfiguration object to declare the authorization and token endpoints of the Yahoo Authorization Server. Using the authorization endpoint, the token endpoint, the client ID and the redirect URI, create the authorization request:
private val RC_AUTH: Int = 1001
private val authenticationEndPoint = "https://api.login.yahoo.com/oauth2/request_auth?lang=en-US"
private val tokenEndPoint ="https://api.login.yahoo.com/oauth2/get_token"
private val redirectUrl = "redirectUrl" // Replace with your redirectUrl (e.g;com.yahoo.ydn://callback)
private val clientSecret = "clientSecret" // Replace with your client secret obtained from developer console against your app.
private val clientId: String = "clientId" // Replace with your clientId obtained from developer console against your app.
private val SHARED_PREFERENCES_NAME = "AuthStatePreference"
private val AUTH_STATE = "AUTH_STATE" // preference key name for auth state
fun getAuthRequest(): AuthorizationRequest {
   val tokenEndPointUri = Uri.parse(tokenEndPoint)
   val authenticationEndPointUri = Uri.parse(authenticationEndPoint)
   val configuration = AuthorizationServiceConfiguration(authenticationEndPointUri, tokenEndPointUri)
   val authRequestBuilder = AuthorizationRequest.Builder(configuration,clientId,ResponseTypeValues.CODE,Uri.parse(redirectUrl) )
   val authRequest = authRequestBuilder
       .setLoginHint("jdoe@user.example.com")
       .setCodeVerifier(CodeVerifierUtil.generateRandomCodeVerifier()) // added for pkce
       .build()
   return authRequest
}
3. Add RedirectReceiverActivity to your app’s AndroidManifest.xml file
<activity android:name="net.openid.appauth.RedirectUriReceiverActivity">
   <intent-filter>
       <action android:name="android.intent.action.VIEW"/>
       <category android:name="android.intent.category.DEFAULT"/>
       <category android:name="android.intent.category.BROWSABLE"/>
       <data
           android:scheme="@string/scheme"/>
   </intent-filter>
</activity>
- Note: If using the Custom Redirect URI, the syntax must be as follows:
scheme://data(e.g.com.yahooapp.demo://callback) - In your app’s build.gradle file, replace the
appAuthRedirectSchemein the defaultConfig block with your scheme (e.g.manifestPlaceholders = [appAuthRedirectScheme: "com.yahooapp.demo"])
4. Perform the authorization request
This request can then be dispatched by calling startActivityForResult using an Intent returned from the AuthorizationService. RC_AUTH in the below example code is the request code to start activity.
private fun doAuthorization() {
   val authService = AuthorizationService(this) // activity context passed here
   val authIntent = authService.getAuthorizationRequestIntent(getAuthRequest())
   startActivityForResult(authIntent, RC_AUTH)
}
5. Handle the authorization response and request an access token
This API will handle the authorization response received in the onActivityResult. If the authorization response is successful, perform the access token request. The onActivityResult code below will handle the authorization response.
override fun onActivityResult(requestCode: Int, resultCode: Int, data: Intent?) {
   super.onActivityResult(requestCode, resultCode, data)
   if (requestCode === RC_AUTH) {
       handleAuthorizationResponse(data)
   } else {
       Log.d(TAG, "Failed to authenticate ....")
   }
}
private fun handleAuthorizationResponse(@NonNull intent: Intent?) {
    intent?.let {
        val response: AuthorizationResponse? = AuthorizationResponse.fromIntent(intent)
        val error: AuthorizationException? = AuthorizationException.fromIntent(intent)
        val authState = AuthState(response, error)
        if (response != null) {
            val service = AuthorizationService(this)
            val clientAuth: ClientAuthentication = ClientSecretBasic(clientSecret)
            val request: TokenRequest = response.createTokenExchangeRequest()
            service.performTokenRequest(request,clientAuth, object :   AuthorizationService.TokenResponseCallback {
                override fun onTokenRequestCompleted(response: TokenResponse?, exception: AuthorizationException?) {
                    if (response != null) {
                        authState.update(response, exception)
                        persistAuthState(authState)
                    }
                }
            })
        }
    }
 }
<!--Stores the authentication state of the user in the shared preference-->
private fun persistAuthState(@NonNull authState: AuthState) {
   getSharedPreferences(SHARED_PREFERENCES_NAME, Context.MODE_PRIVATE).edit()
       .putString(AUTH_STATE, authState.jsonSerializeString())
       .commit()
}
<!-- Retrieves the authentication state of the user from the shared preference-->
private fun restoreAuthState(): AuthState? {
   val jsonString = getSharedPreferences(SHARED_PREFERENCES_NAME, Context.MODE_PRIVATE)
       .getString(AUTH_STATE, null)
   jsonString?.let {
       if (!TextUtils.isEmpty(jsonString)) {
           var authState: AuthState? = null
           try {
               authState = AuthState.jsonDeserialize(jsonString)
           } catch (e: JSONException) {
               e.printStackTrace()
           }
           return authState
       }
   }
   return null
}
6. Call the Get User Info API to fetch user information
<!--Make API call to get user info using okhttp client-->
fun getUserInfo(){
   var authState: AuthState? = restoreAuthState()
   val authorizationService = AuthorizationService(this)
   authState?.performActionWithFreshTokens(authorizationService,object : AuthState.AuthStateAction {
       override fun execute(accessToken: String?, idToken: String?, ex: AuthorizationException?) {
           accessToken?.let {
               val client = OkHttpClient()
               val request: Request = Request.Builder()
                   .url("https://api.login.yahoo.com/openid/v1/userinfo")
                   .addHeader("Authorization", String.format("Bearer %s", accessToken))
                   .build()
               client.newCall(request).enqueue(object : Callback {
                   override fun onFailure(call: Call, e: IOException) {
                       Toast.makeText(this@MainActivity,"Something went wrong !",Toast.LENGTH_LONG).show()
                   }
                   override fun onResponse(call: Call, response: Response) {
                       val userInfo: String? = response.body?.string()
                       userInfo?.let {
                           val userJSONObject = JSONObject(userInfo)
                           setUserProfile(userJSONObject)
                       }
                   }
               })
           }
       }
   })
}
private fun setUserProfile(userJSONObject: JSONObject) {
   runOnUiThread(object:Runnable{
       override fun run() {
           fullName.text = userJSONObject.optString("name", null)
           givenName.text = userJSONObject.optString("given_name", null)
           familyName.text = userJSONObject.optString("family_name", null)
           val imageUrl = userJSONObject.optString("picture", null)
           <!--Using Glide to show the user image-->
                   Glide.with(this@MainActivity).load(imageUrl).into(profileImage);
       }
   })
}
7. Appendix
AppAuth: https://github.com/openid/AppAuth-Android
OkHttp: https://square.github.io/okhttp/4.x/okhttp/okhttp3/-ok-http-client/
OAuth: https://oauth.net/2/
iOS Example
This reference provides code samples for implementing the Sign In With Yahoo Authorization Code Flow for your iOS mobile application.
Table of Contents
- Import AppAuth in viewcontroller and Appdelegate
- Create an OIDServiceConfiguration object using an authorization endpoint and a token endpoint
- Create a currrentAuthorizationFlow object in appdelegate
- Create an OIDAuthorizationRequest and call authState()
- Call the Get User Info API to fetch user information
- Appendix
1. Import AppAuth in viewcontroller and Appdelegate
Include AppAuth in Podfile and run pod install in the terminal window.
OIDServiceConfiguration, OIDExternalUserAgentSession, OIDAuthorizationRequest, OIDAuthState are the classes used from AppAuth.
2. Create an OIDServiceConfiguration object using an authorization endpoint and a token endpoint
let authEndpoint = URL(string:"https://api.login.yahoo.com/oauth2/request_auth_fe")!
let tokenEndpoint = URL(string:"https://api.login.yahoo.com/oauth2/get_token")!
let configuration = OIDServiceConfiguration(authorizationEndpoint: authEndpoint, tokenEndpoint: tokenEndpoint)
3. Create a currrentAuthorizationFlow object in appdelegate
var currentAuthorizationFlow: OIDExternalUserAgentSession?
4. Create an OIDAuthorizationRequest and call authState()
let request = OIDAuthorizationRequest(configuration: configuration,
    clientId: clientID,
    clientSecret: clientSecret,
    scopes: nil,
    redirectURL: redirectURI,
    responseType: OIDResponseTypeCode,
    additionalParameters: [“lang”: “en-US”])

// Perform authentication request
print("Initiating authorization request with scope: \(request.scope ?? "nil")")

let appDelegate = UIApplication.shared.delegate as! AppDelegate

appDelegate.currentAuthorizationFlow =
    OIDAuthState.authState(byPresenting: request, presenting: self) { authState, error in
  if let authState = authState {
     guard let authToken = authState.lastTokenResponse?.accessToken else {return}
    print("Got authorization tokens. Access token: \(authToken)")
    self.getUserInfo(token: authToken)
  } else {
    print("Authorization error: \(error?.localizedDescription ?? "Unknown error")")
  }
}
This will redirect the user to the Yahoo Authorization Consent Screen. After the user authorizes access to the requested data scopes, they will be redirected to your app’s redirect URI with the Authorization Code as a query parameter in the URL.
5. Call the Get User Info API to fetch user information
func getUserInfo(token: String) {
    let url = URL(string: "https://api.login.yahoo.com/openid/v1/userinfo")!
    var request = URLRequest(url: url)
    request.httpMethod = "GET"
    let sessionConfig = URLSessionConfiguration.default
    let authValue: String? = "Bearer \(token)"
    sessionConfig.httpAdditionalHeaders = ["Authorization": authValue ?? ""]
    let session = URLSession(configuration: sessionConfig, delegate: self as? URLSessionDelegate, delegateQueue: nil)

    let task = session.dataTask(with: request as URLRequest){ (data,response,error) -> Void in

        if error != nil {
            print(error?.localizedDescription as Any)
            return
        }
        do {
            let json = try JSONSerialization.jsonObject(with: data!,
                            options: JSONSerialization.ReadingOptions.mutableContainers) as! NSDictionary
            print(json)
            let jsonData = try JSONSerialization.data(withJSONObject: json)
            if let json = String(data: jsonData, encoding: .utf8) {
                print(json)
            }
        }
        catch let error as NSError {
            print(error.localizedDescription)
        }
    }
    task.resume()
}
This GET request should return a JSON response with the following format:
{
    "birthdate" = "xxxx",
    "email" = "xxxx@yahoo.com",
    "email_verified" = true,
    "family_name" = "xxxx",
    "gender" = "xxxx",
    "given_name" = "xxxx",
    "locale" = "en-US",
    "name" = "xxxx",
    "nickname" = "xxxx",
    "picture" = "https://s.yimg.com/ag/images/default_user_profile_pic_192sq.jpg",
    "profile_images" =     {
        image128 = "https://s.yimg.com/ag/images/default_user_profile_pic_128sq.jpg",
        image192 = "https://s.yimg.com/ag/images/default_user_profile_pic_192sq.jpg",
        image32 = "https://s.yimg.com/ag/images/default_user_profile_pic_32sq.jpg",
        image64 = "https://s.yimg.com/ag/images/default_user_profile_pic_64sq.jpg",
    },
    "sub" = "xxxx"
}
6. Appendix
Java Example
This reference provides code samples for implementing the Sign In With Yahoo Authorization Code Flow for your Java web server.
Table of Contents
- Register your application on the Yahoo Developer Network (YDN) to receive your OAuth 2.0 credentials
- Redirect the user to the
/request_authendpoint so that they may authorize access to their data - Exchange the Authorization Code for tokens using the
/get_tokenendpoint - Fetch user information using the Get User Info API
- When the Access Token expires, exchange the Refresh Token for a new Access Token
- FAQ
1. Register your application on the Yahoo Developer Network (YDN) to receive your OAuth 2.0 credentials
Sign in to your existing Yahoo account or create a new account.
Create an application on YDN to get your Client ID and Client Secret. For more help with this step, please refer to our integration guide.
2. Redirect the user to the /request_auth endpoint so that they may authorize access to their data
private  ResponseEntity<String> response

@GetMapping("/send_to_consent")
public void getLogin(HttpServletRequest request, HttpServletResponse httpResponse) throws IOException {
    String path = "https://api.login.yahoo.com/oauth2/request_auth_fe";
    String clientId = "dj0yJmk9RVg4bzdsfdsdadU5aQk1NJmQ9WVdrOWFWUjNUM05wZW5RbWNHbzlNQT09JnM9Y29uc3snfslnfNLnkbKLNkbbKNlnLN";
    String responseType = "code";
    String redirectUri = "https://localhost:8080/dashboard";
    String scope = "openid";
    String lang = request.getLocale().toString();
    String url =
        path+"?lang="+lang+"&client_id="+clientId+"&response_type="+responseType+"&redirect_uri="+redirectUri+"&scope="+scope;
    httpResponse.sendRedirect(url);
};
This will redirect the user to the Yahoo Authorization Consent Screen. After the user authorizes access to the requested data scopes, they will be redirected to your app’s redirect URI with the Authorization Code as a query parameter in the URL.
3. Exchange the Authorization Code for tokens using the /get_token endpoint
@GetMapping("/dashboard")
@ResponseBody
public String getTokens(@RequestParam("code") String authcode, HttpServletResponse httpServletResponse) throws IOException {
    logger.log(Level.INFO, "Authorization code : " + authcode);
    final String uri = "https://api.login.yahoo.com/oauth2/get_token";

    // Create REST template to make POST request to /get_token API
    RestTemplate restTemplate = new RestTemplate();
    HttpHeaders headers = new HttpHeaders();
    headers.setContentType(MediaType.APPLICATION_FORM_URLENCODED);
    String client_id = "dj0yJmk9RVg4bzdadU5aQk1NJmQ9WVdrOWFWUjNUM05wZW5RbWNHbzlNQT09JnM9Y29uc3snfslnfNLnkbKLNkbbKNlnLN";
    String client_secret = "6ae32f5f42a8bbcc7ksjd53k2j52knbk";
    String code = authcode;
    String grant_type = "authorization_code";
    String redirect_uri = "https://localhost:8080/dashboard";

    // Generate Multimap to pass parameters in request body
    MultiValueMap<String, String> map = new LinkedMultiValueMap<String, String>();
    map.add("client_id", client_id);
    map.add("client_secret", client_secret);
    map.add("redirect_uri", redirect_uri);
    map.add("grant_type", grant_type);
    map.add("code", authcode);

    HttpEntity<MultiValueMap<String, String>> request = new HttpEntity<MultiValueMap<String, String>>(map, headers);
    response = restTemplate.postForEntity(uri, request, String.class);
    if (response.getStatusCode().equals(HttpStatus.OK)) {
        logger.log(Level.INFO, "Response : " + response.toString());
        httpServletResponse.sendRedirect("/getUserInfo");
    } else {
        return "error";
    }
    return "index";
}
This POST request should return a JSON response with the following format:
{
    "Access_token":
    "SpATBoGavhqoHHwGqKwo6RU0HstGU9GY3wv74Zlmc0lfX9DvAv..2HSPKP6I4gczBszC7hl.wuffgGgideD3fMrOmCAYVeRLjO3XyOyV2zoTEdBd1p2eMIxS6vxTY8DmOaT5Llf8zwUulFeQBZCdTIIdFp__iuQQ.Z5UoJcCxqGUwsd1Xgex7gTPMx2xz1EHpyy.KOmK3stbOITbr_Yf3RYCDWTo9M.Rn2LCXfqtw18EdUol4sWnDfKBzce4YmzQ2TulJ4RUBTcL0jvEnAwBFZtdxO59fc82F2GMjgu5kPppRWCk8uS.mjO3L8bu9gbAeuM1Pk5ovVBevz.Ff4pbmOx5YleNC93gP07o6t0VeUMFlJVoQuvvQd2LXZLXB5fKCNjjwX_eZfvPvDRXfJly6WhnM3JbDHvHKpXIgLBqXq3PX83PBUUr45WT3xiXx2rk7j6h4v76bOes0p8yF79gNbG3s_ItNgQtRrW7_ctrtDEn8QkgpPTGwIWhsLwHWd.q4W999WpaCQ1ihKz3mD_FuoKrJkxWE8L0XyMv8.wDULWICixUl0MundbeL6JZTCW3vIuZk7Gpa6PY12Vvketngj048mDSsNBkZm0ugHEn1QaHmJQrw_R3UQq1tOL8yAFoi2_p3FG55ZMr7dfkneUPNWpyFBjn56_cyYmHq9EbsgRLW79YcE.Egtg9gr7kNqSa1rw3MTKVl3X8JiWC4oJASG8pyZ21Fkm16gKrt5V5M1uzUxR2wpQCZXedq7PAOUlv3G17UneAeNTxSJZ6k3HDMH0M8nxkabjvCe2idc0l8wg10MzYG9iXKzl1Q7dvifFxStAbcyGV3NXY8h_cjzxT7zKvyPONTlKzxCHAE60JNhGKKN3W64iFYH5jI_4OSnEwaNU4r6WVRVBtktoQMpZHyhiT2cusVy9OuthDPoTbZwA9Xsbodmr3EfsFkuRwB7KV5NXSrn20CTmeVcHCzkuRf_l_uxx94kWkxrRwAg3Ahiij04rozuygj.OYwEGDSSu7xUN0NbYSKUdi",
    "expires_in": 3600,
    "Id_token":
    "eyJhbGciOiJFUzI1NiIsImtpZCI6IjM0NjZkNTFmN2RkMGM3ODA1NjU2ODhjMTgzOTIxODE2YzQ1ODg5YWQifQ.eyJhdF9oYXNoIjoieHR5dmI1OHZscVBqM20ydnFhRlkyQSIsInN1YiI6IlFFV0tTSUM0NlRZN01YTVo1NEFDV1NJSUFFIiwiZW1haWxfdmVyaWZpZWQiOnRydWUsImJpcnRoZGF0ZSI6IjE5OTgiLCJnZW5kZXIiOiJub3REaXNjbG9zZWQiLCJpc3MiOiJodHRwczovL2FwaS5sb2dpbi55YWhvby5jb20iLCJwcm9maWxlX2ltYWdlcyI6eyJpbWFnZTY0IjoiaHR0cHM6Ly9zLnlpbWcuY29tL2FnL2ltYWdlcy9kZWZhdWx0X3VzZXJfcHJvZmlsZV9waWNfNjRzcS5qcGciLCJpbWFnZTE5MiI6Imh0dHBzOi8vcy55aW1nLmNvbS9hZy9pbWFnZXMvZGVmYXVsdF91c2VyX3Byb2ZpbGVfcGljXzE5MnNxLmpwZyIsImltYWdlMTI4IjoiaHR0cHM6Ly9zLnlpbWcuY29tL2FnL2ltYWdlcy9kZWZhdWx0X3VzZXJfcHJvZmlsZV9waWNfMTI4c3EuanBnIiwiaW1hZ2UzMiI6Imh0dHBzOi8vcy55aW1nLmNvbS9hZy9pbWFnZXMvZGVmYXVsdF91c2VyX3Byb2ZpbGVfcGljXzMyc3EuanBnIn0sImdpdmVuX25hbWUiOiJBYmhpbmF2IiwibWlkZGxlX25hbWUiOiIiLCJsb2NhbGUiOiJlbi1VUyIsInBpY3R1cmUiOiJodHRwczovL3MueWltZy5jb20vYWcvaW1hZ2VzL2RlZmF1bHRfdXNlcl9wcm9maWxlX3BpY18xOTJzcS5qcGciLCJzaWQiOiJncU1BZHN3eWNlWFQiLCJhdWQiOiJkajB5Sm1rOU1UTjRTbU5rVFVkMFdFWkVKbVE5V1Zkck9WbHFUazloYlZKT1VXczRiV05IYnpsTlFUMDlKbk05WTI5dWMzVnRaWEp6WldOeVpYUW1jM1k5TUNaNFBXRm0iLCJhdXRoX3RpbWUiOjE2Mzg4NjI5MTYsIm5pY2tuYW1lIjoiQWJoaW5hdiIsIm5hbWUiOiJBYmhpbmF2IFNoYXJtYSIsInNlc3Npb25fZXhwIjoxNjQwMDcyNTE2LCJleHAiOjE2Mzg4NjY1MTcsImFwcF9pZCI6ImRqMHlKbWs5TVRONFNtTmtUVWQwV0VaRUptUTlXVmRyT1ZscVRrOWhiVkpPVVdzNGJXTkhiemxOUVQwOUpuTTlZMjl1YzNWdFpYSnpaV055WlhRbWMzWTlNQ1o0UFdGbSIsImlhdCI6MTYzODg2MjkxNywiZmFtaWx5X25hbWUiOiJTaGFybWEiLCJlbWFpbCI6ImFiaGluYXYyMzZzaGFybWFAeWFob28uY29tIn0.eFtw875qj1m96uMPDJXr4b9qbcJ5hdNinGJFbw1KiiLpFGRhsgIK6GkEux_uKKU-gHjqJjFd1oau5P21jKdhDQ",
    "Refresh_token":
    "AIb5rmG2Vaw6BIzD6..w.n5mV5Px7QenSnALZAJafc6O2yD7M2dn1p8I",
    "token_type": "bearer"
}
You can use a localhost URL to validate your implementation:
https://127.0.0.1:8080/dashboard?code=yxwcp9xf4a3nwjszf9n826jp5gx5qpbw
4. Fetch user information using the Get User Info API
@GetMapping("/getUserInfo")
private String getUserInfo(Model model) {
    String accessToken = splitToken(response,"access_token");
    String uri = "https://api.login.yahoo.com/openid/v1/userinfo";
    HttpHeaders headers = new HttpHeaders();
    headers.set("host", "api.login.yahoo.com");
    headers.set("Authorization", "Bearer " + accessToken);

    // Create REST template for GET request to /userinfo API
    RestTemplate restTemplate = new RestTemplate();
    ResponseEntity<String> response = restTemplate.exchange(uri,
                                        HttpMethod.GET,
                                        new HttpEntity<String>(headers),
                                        String.class);
    if (response.getStatusCode().equals(HttpStatus.OK)) {
        // After retrieving user info, create a model object for displaying in UI
        logger.log(Level.INFO, "User Info: " + response.getBody().toString());
        JSONObject jsonObject = new JSONObject(response.getBody());
        model.addAttribute("username", jsonObject.getString("name"));
        model.addAttribute("email", jsonObject.getString("email"));
        model.addAttribute("locale", jsonObject.getString("locale"));
        model.addAttribute("birthdate", jsonObject.getString("birthdate"));
        model.addAttribute("gender", jsonObject.getString("gender"));
        return model.toString();
    } else {
        return "error";
    }

}

// Method to split Access Token
private String parseTokenFromResponse(ResponseEntity<String> response, String tokenType) {
    JSONObject jsonObject = new JSONObject(response.getBody());
    String token = jsonObject.getString(tokenType);
    return token;
}
This GET request should return a JSON response with the following format:
{
    "birthdate" = "xxxx",
    "email" = "xxxx@yahoo.com",
    "email_verified" = true,
    "family_name" = "xxxx",
    "gender" = "xxxx",
    "given_name" = "xxxx",
    "locale" = "en-US",
    "name" = "xxxx",
    "nickname" = "xxxx",
    "picture" = "https://s.yimg.com/ag/images/default_user_profile_pic_192sq.jpg",
    "profile_images" =     {
        image128 = "https://s.yimg.com/ag/images/default_user_profile_pic_128sq.jpg",
        image192 = "https://s.yimg.com/ag/images/default_user_profile_pic_192sq.jpg",
        image32 = "https://s.yimg.com/ag/images/default_user_profile_pic_32sq.jpg",
        image64 = "https://s.yimg.com/ag/images/default_user_profile_pic_64sq.jpg",
    },
    "sub" = "xxxx"
}
5. When the Access Token expires, exchange the Refresh Token for a new Access Token
@GetMapping("/refresh")
@ResponseBody
private String refreshToken(Model model,
HttpServletResponse httpServletResponse) throws IOException {
    logger.log(Level.INFO, "Requesting for refresh token : ");
    final String uri = "https://api.login.yahoo.com/oauth2/get_token";
    String intialRefreshToken = parseTokenFromResponse(response, "refresh_token");

    // Create REST template to make POST request to /get_token API
    RestTemplate restTemplate = new RestTemplate();
    HttpHeaders headers = new HttpHeaders();
    headers.setContentType(MediaType.APPLICATION_FORM_URLENCODED);
    String client_id = "dj0yJmk9MjlKSm12MnlOd284JmQ9WVdrOWJFZElielZIUTNjbWNHbzlNQT09JnM9Y29uc3VtZXJzZWNyZXQmc3Y9MCZ4PTJj";
    String client_secret = "98d9c650cded80fd0244c8c29e4da7390b1853dd";
    String grant_type = "refresh_token";
    String redirect_uri = "https://localhost:8080/dashboard";

    // Generate Multimap to pass parameters in request body
    MultiValueMap<String, String> map = new LinkedMultiValueMap<String, String>();
    map.add("client_id", client_id);
    map.add("client_secret", client_secret);
    map.add("redirect_uri", redirect_uri);
    map.add("grant_type", grant_type);
    map.add("refresh_token", intialRefreshToken);

    HttpEntity<MultiValueMap<String, String>> request = new HttpEntity<MultiValueMap<String, String>>(map, headers);
    response = restTemplate.postForEntity(uri, request, String.class);
    logger.log(Level.INFO, "Response : " + response.toString());
    if (response.getStatusCode().equals(HttpStatus.OK)) {
        logger.log(Level.INFO, "Response : " + response.toString());
        httpServletResponse.sendRedirect("/getUserInfo");
    } else {
        return "error";
    }
    return "index";
}

private String parseTokenFromResponse(ResponseEntity<String> response, String tokenType) {
    JSONObject jsonObject = new JSONObject(response.getBody());
    String token = jsonObject.getString(tokenType);
    return token;
}
6. FAQ
Q. Do I need to enable HTTPS on my local environment when locally testing my application with the Yahoo Authorization Server?
A. Yes, you do. We recommend creating a Spring Boot Java application to help enable HTTPs.
Node.js Example
This reference provides code samples for implementing the Sign In With Yahoo Authorization Code Flow for your Node.js web server.
Table of Contents
- Register your application on the Yahoo Developer Network (YDN) to receive your OAuth 2.0 credentials
- Redirect the user to the
/request_authendpoint so that they may authorize access to their data - Exchange the Authorization Code for tokens using the
/get_tokenendpoint - Fetch user information using the Get User Info API
- When the Access Token expires, exchange the Refresh Token for a new Access Token
- FAQ
1. Register your application on the Yahoo Developer Network (YDN) to receive your OAuth 2.0 credentials
Sign in to your existing Yahoo account or create a new account.
Create an application on YDN to get your Client ID and Client Secret. For more help with this step, please refer to our integration guide.
2. Redirect the user to the /request_auth endpoint so that they may authorize access to their data
app.get('/signin',(request,response) => {
    const lang = navigator.language;
    let url =
    "https://api.login.yahoo.com/oauth2/request_auth_fe?client_id=dj0yJmk9N1VYYlhZV0FXbXdjJmQ9WVdrOVYxVlNVV2RzUjBvbWNHbzlNQT09JnM9Y29uc3VtZXJzZWNyZXQmc3Y9MCZ4PWQ1&response_type=code&redirect_uri=https://localhost:4000/dashboard&language="+lang;
    response.redirect(url);
});
This will redirect the user to the Yahoo Authorization Consent Screen. After the user authorizes access to the requested data scopes, they will be redirected to your app’s redirect URI with the Authorization Code as a query parameter in the URL.
3. Exchange the Authorization Code for tokens using the /get_token endpoint
var dashboard_response = {};
app.get('/dashboard',(req,res) => {
    let authCode = req.query.code;
    let url = 'https://api.login.yahoo.com/oauth2/get_token';
    let requestBody = {
        client_id :
            'dj0yJmk9Nfgdg1VYYlhZV0FXbXdjJmQ9WVdrOVYxVlNVV2RzUjBvbWNHbzlNQT09JnM9Y29uc3VtZXJzZWNyZXQmc3Y9MCZ4PWQ1',
        client_secret :
            'b628a40ab1b5463fc35fdgf7e5527a795ecdb280be0b',
        redirect_uri : 'https://localhost:4000/dashboard',
        code : authCode,
        grant_type : 'authorization_code'
    };
    let data =
        Object.keys(requestBody).map(key=>encodeURIComponent(key) + '=' + encodeURIComponent(requestBody[key])).join('&');
    fetch(url, {
        method: 'post',
        headers: {
            'Content-Type':'application/x-www-form-urlencoded'
        },
        body: data
    }).then(function (response) {
        dashboard_response=response.json();
        return response.json();
    });
});
This POST request should return a JSON response with the following format:
{
    "Access_token":
    "SpATBoGavhqoHHwGqKwo6RU0HstGU9GY3wv74Zlmc0lfX9DvAv..2HSPKP6I4gczBszC7hl.wuffgGgideD3fMrOmCAYVeRLjO3XyOyV2zoTEdBd1p2eMIxS6vxTY8DmOaT5Llf8zwUulFeQBZCdTIIdFp__iuQQ.Z5UoJcCxqGUwsd1Xgex7gTPMx2xz1EHpyy.KOmK3stbOITbr_Yf3RYCDWTo9M.Rn2LCXfqtw18EdUol4sWnDfKBzce4YmzQ2TulJ4RUBTcL0jvEnAwBFZtdxO59fc82F2GMjgu5kPppRWCk8uS.mjO3L8bu9gbAeuM1Pk5ovVBevz.Ff4pbmOx5YleNC93gP07o6t0VeUMFlJVoQuvvQd2LXZLXB5fKCNjjwX_eZfvPvDRXfJly6WhnM3JbDHvHKpXIgLBqXq3PX83PBUUr45WT3xiXx2rk7j6h4v76bOes0p8yF79gNbG3s_ItNgQtRrW7_ctrtDEn8QkgpPTGwIWhsLwHWd.q4W999WpaCQ1ihKz3mD_FuoKrJkxWE8L0XyMv8.wDULWICixUl0MundbeL6JZTCW3vIuZk7Gpa6PY12Vvketngj048mDSsNBkZm0ugHEn1QaHmJQrw_R3UQq1tOL8yAFoi2_p3FG55ZMr7dfkneUPNWpyFBjn56_cyYmHq9EbsgRLW79YcE.Egtg9gr7kNqSa1rw3MTKVl3X8JiWC4oJASG8pyZ21Fkm16gKrt5V5M1uzUxR2wpQCZXedq7PAOUlv3G17UneAeNTxSJZ6k3HDMH0M8nxkabjvCe2idc0l8wg10MzYG9iXKzl1Q7dvifFxStAbcyGV3NXY8h_cjzxT7zKvyPONTlKzxCHAE60JNhGKKN3W64iFYH5jI_4OSnEwaNU4r6WVRVBtktoQMpZHyhiT2cusVy9OuthDPoTbZwA9Xsbodmr3EfsFkuRwB7KV5NXSrn20CTmeVcHCzkuRf_l_uxx94kWkxrRwAg3Ahiij04rozuygj.OYwEGDSSu7xUN0NbYSKUdi",
    "expires_in": 3600,
    "Id_token":
    "eyJhbGciOiJFUzI1NiIsImtpZCI6IjM0NjZkNTFmN2RkMGM3ODA1NjU2ODhjMTgzOTIxODE2YzQ1ODg5YWQifQ.eyJhdF9oYXNoIjoieHR5dmI1OHZscVBqM20ydnFhRlkyQSIsInN1YiI6IlFFV0tTSUM0NlRZN01YTVo1NEFDV1NJSUFFIiwiZW1haWxfdmVyaWZpZWQiOnRydWUsImJpcnRoZGF0ZSI6IjE5OTgiLCJnZW5kZXIiOiJub3REaXNjbG9zZWQiLCJpc3MiOiJodHRwczovL2FwaS5sb2dpbi55YWhvby5jb20iLCJwcm9maWxlX2ltYWdlcyI6eyJpbWFnZTY0IjoiaHR0cHM6Ly9zLnlpbWcuY29tL2FnL2ltYWdlcy9kZWZhdWx0X3VzZXJfcHJvZmlsZV9waWNfNjRzcS5qcGciLCJpbWFnZTE5MiI6Imh0dHBzOi8vcy55aW1nLmNvbS9hZy9pbWFnZXMvZGVmYXVsdF91c2VyX3Byb2ZpbGVfcGljXzE5MnNxLmpwZyIsImltYWdlMTI4IjoiaHR0cHM6Ly9zLnlpbWcuY29tL2FnL2ltYWdlcy9kZWZhdWx0X3VzZXJfcHJvZmlsZV9waWNfMTI4c3EuanBnIiwiaW1hZ2UzMiI6Imh0dHBzOi8vcy55aW1nLmNvbS9hZy9pbWFnZXMvZGVmYXVsdF91c2VyX3Byb2ZpbGVfcGljXzMyc3EuanBnIn0sImdpdmVuX25hbWUiOiJBYmhpbmF2IiwibWlkZGxlX25hbWUiOiIiLCJsb2NhbGUiOiJlbi1VUyIsInBpY3R1cmUiOiJodHRwczovL3MueWltZy5jb20vYWcvaW1hZ2VzL2RlZmF1bHRfdXNlcl9wcm9maWxlX3BpY18xOTJzcS5qcGciLCJzaWQiOiJncU1BZHN3eWNlWFQiLCJhdWQiOiJkajB5Sm1rOU1UTjRTbU5rVFVkMFdFWkVKbVE5V1Zkck9WbHFUazloYlZKT1VXczRiV05IYnpsTlFUMDlKbk05WTI5dWMzVnRaWEp6WldOeVpYUW1jM1k5TUNaNFBXRm0iLCJhdXRoX3RpbWUiOjE2Mzg4NjI5MTYsIm5pY2tuYW1lIjoiQWJoaW5hdiIsIm5hbWUiOiJBYmhpbmF2IFNoYXJtYSIsInNlc3Npb25fZXhwIjoxNjQwMDcyNTE2LCJleHAiOjE2Mzg4NjY1MTcsImFwcF9pZCI6ImRqMHlKbWs5TVRONFNtTmtUVWQwV0VaRUptUTlXVmRyT1ZscVRrOWhiVkpPVVdzNGJXTkhiemxOUVQwOUpuTTlZMjl1YzNWdFpYSnpaV055WlhRbWMzWTlNQ1o0UFdGbSIsImlhdCI6MTYzODg2MjkxNywiZmFtaWx5X25hbWUiOiJTaGFybWEiLCJlbWFpbCI6ImFiaGluYXYyMzZzaGFybWFAeWFob28uY29tIn0.eFtw875qj1m96uMPDJXr4b9qbcJ5hdNinGJFbw1KiiLpFGRhsgIK6GkEux_uKKU-gHjqJjFd1oau5P21jKdhDQ",
    "Refresh_token":
    "AIb5rmG2Vaw6BIzD6..w.n5mV5Px7QenSnALZAJafc6O2yD7M2dn1p8I",
    "token_type": "bearer"
}
You can use a localhost URL to validate your implementation:
https://127.0.0.1:5000/dashboard?code=yxwcp9xf4a3nwjszf9n826jp5gx5qpbw
4. Fetch user information using the Get User Info API
let authHead = "Bearer " + result.access_token;
fetch('https://api.login.yahoo.com/openid/v1/userinfo', {
    method: "GET",
    headers: {
        "host": "api.login.yahoo.com",
        "Authorization": authHead
    }
}).then((serverPromise) =>
    serverPromise.json()
        .then((res) => console.log('user info ',res))
        .catch((e) => console.log(e))
)
This GET request should return a JSON response with the following format:
{
    "birthdate" = "xxxx",
    "email" = "xxxx@yahoo.com",
    "email_verified" = true,
    "family_name" = "xxxx",
    "gender" = "xxxx",
    "given_name" = "xxxx",
    "locale" = "en-US",
    "name" = "xxxx",
    "nickname" = "xxxx",
    "picture" = "https://s.yimg.com/ag/images/default_user_profile_pic_192sq.jpg",
    "profile_images" =   {
        image128 = "https://s.yimg.com/ag/images/default_user_profile_pic_128sq.jpg",
        image192 = "https://s.yimg.com/ag/images/default_user_profile_pic_192sq.jpg",
        image32 = "https://s.yimg.com/ag/images/default_user_profile_pic_32sq.jpg",
        image64 = "https://s.yimg.com/ag/images/default_user_profile_pic_64sq.jpg",
    },
    "sub" = "xxxx"
}
5. When the Access Token expires, exchange the Refresh Token for a new Access Token
app.get('/refresh',(req,res) => {
    let refresh_token = dashboard_response.refresh_token;
    let url = 'https://api.login.yahoo.com/oauth2/get_token';
    let requestBody = {
        client_id :
            'dj0yJmk9Nfgdg1VYYlhZV0FXbXdjJmQ9WVdrOVYxVlNVV2RzUjBvbWNHbzlNQT09JnM9Y29uc3VtZXJzZWNyZXQmc3Y9MCZ4PWQ1',
        client_secret :
            'b628a40ab1b5463fc35fdgf7e5527a795ecdb280be0b',
        redirect_uri : 'https://localhost:4000/dashboard',
        refresh_token : refresh_token,
        grant_type : 'refresh_token'
    };
    let data =
        Object.keys(requestBody).map(key=>encodeURIComponent(key) + '=' + encodeURIComponent(requestBody[key])).join('&');
    fetch(url, {
        method: 'post',
        headers: {
            'Content-Type':'application/x-www-form-urlencoded'
        },
        body: data
    }).then(function (response) {
        return response.json();
    });
});
6. FAQ
Q. Do I need to enable HTTPS on my local environment when locally testing my application with the Yahoo Authorization Server?
A. Yes, you do. Please refer to this guide for creating an HTTPS server in Node.js.
Python Example
This reference provides code samples for implementing the Sign In With Yahoo Authorization Code Flow for your Python web server.
Table of Contents
- Register your application on the Yahoo Developer Network (YDN) to receive your OAuth 2.0 credentials
- Redirect the user to the
/request_authendpoint so that they may authorize access to their data - Exchange the Authorization Code for tokens using the
/get_tokenendpoint - Fetch user information using the Get User Info API
- When the Access Token expires, exchange the Refresh Token for a new Access Token
- FAQ
1. Register your application on the Yahoo Developer Network (YDN) to receive your OAuth 2.0 credentials
Sign in to your existing Yahoo account or create a new account.
Create an application on YDN to get your Client ID and Client Secret. For more help with this step, please refer to our integration guide.
2. Redirect the user to the /request_auth endpoint so that they may authorize access to their data
client_id = 'dj0yJmk9ZWlpaFB2TWNNZGJXJmQ9WVdrOVpXMXFjRzFZTVVFbWNHbzlNQT09JnM9Y29uc3VtZXJzZWNyZXQmc3Y9MCZ4PTc4'
client_secret = 'e039b733257e0887c8c403e3b51844f9a2c87d45'
base_url = 'https://api.login.yahoo.com/'
redirect_uri = "https://127.0.0.1:5000/dashboard"

@app.route("/send_to_consent")
def send_to_login():
    lang = re.split('[,;/ ]+', request.accept_languages.to_header())[0]
    code_url = f'oauth2/request_auth?client_id={client_id}&redirect_uri={redirect_uri}&response_type=code&scope=openid&language={lang}'
    url = base_url + code_url
    return redirect(url,code=302)
This will redirect the user to the Yahoo Authorization Consent Screen. After the user authorizes access to the requested data scopes, they will be redirected to your app’s redirect URI with the Authorization Code as a query parameter in the URL.
3. Exchange the Authorization Code for tokens using the /get_token endpoint
@app.route("/dashboard")
def get_tokens():
    code = request.args.get('code')
    encoded = base64.b64encode((client_id + ':' + client_secret).encode("utf-8"))
    headers = {
        'Authorization': f'Basic {encoded.decode("utf-8")}',
        'Content-Type': 'application/x-www-form-urlencoded'
    }
    data = {
        'grant_type': 'authorization_code',
        'redirect_uri': redirect_uri,
        'code': code
    }
    global response
    response = post(base_url + 'oauth2/get_token', headers=headers, data=data)
    response.ok
    return response.json()
This POST request should return a JSON response with the following format:
{
    "Access_token":
    "SpATBoGavhqoHHwGqKwo6RU0HstGU9GY3wv74Zlmc0lfX9DvAv..2HSPKP6I4gczBszC7hl.wuffgGgideD3fMrOmCAYVeRLjO3XyOyV2zoTEdBd1p2eMIxS6vxTY8DmOaT5Llf8zwUulFeQBZCdTIIdFp__iuQQ.Z5UoJcCxqGUwsd1Xgex7gTPMx2xz1EHpyy.KOmK3stbOITbr_Yf3RYCDWTo9M.Rn2LCXfqtw18EdUol4sWnDfKBzce4YmzQ2TulJ4RUBTcL0jvEnAwBFZtdxO59fc82F2GMjgu5kPppRWCk8uS.mjO3L8bu9gbAeuM1Pk5ovVBevz.Ff4pbmOx5YleNC93gP07o6t0VeUMFlJVoQuvvQd2LXZLXB5fKCNjjwX_eZfvPvDRXfJly6WhnM3JbDHvHKpXIgLBqXq3PX83PBUUr45WT3xiXx2rk7j6h4v76bOes0p8yF79gNbG3s_ItNgQtRrW7_ctrtDEn8QkgpPTGwIWhsLwHWd.q4W999WpaCQ1ihKz3mD_FuoKrJkxWE8L0XyMv8.wDULWICixUl0MundbeL6JZTCW3vIuZk7Gpa6PY12Vvketngj048mDSsNBkZm0ugHEn1QaHmJQrw_R3UQq1tOL8yAFoi2_p3FG55ZMr7dfkneUPNWpyFBjn56_cyYmHq9EbsgRLW79YcE.Egtg9gr7kNqSa1rw3MTKVl3X8JiWC4oJASG8pyZ21Fkm16gKrt5V5M1uzUxR2wpQCZXedq7PAOUlv3G17UneAeNTxSJZ6k3HDMH0M8nxkabjvCe2idc0l8wg10MzYG9iXKzl1Q7dvifFxStAbcyGV3NXY8h_cjzxT7zKvyPONTlKzxCHAE60JNhGKKN3W64iFYH5jI_4OSnEwaNU4r6WVRVBtktoQMpZHyhiT2cusVy9OuthDPoTbZwA9Xsbodmr3EfsFkuRwB7KV5NXSrn20CTmeVcHCzkuRf_l_uxx94kWkxrRwAg3Ahiij04rozuygj.OYwEGDSSu7xUN0NbYSKUdi",
    "expires_in": 3600,
    "Id_token":
    "eyJhbGciOiJFUzI1NiIsImtpZCI6IjM0NjZkNTFmN2RkMGM3ODA1NjU2ODhjMTgzOTIxODE2YzQ1ODg5YWQifQ.eyJhdF9oYXNoIjoieHR5dmI1OHZscVBqM20ydnFhRlkyQSIsInN1YiI6IlFFV0tTSUM0NlRZN01YTVo1NEFDV1NJSUFFIiwiZW1haWxfdmVyaWZpZWQiOnRydWUsImJpcnRoZGF0ZSI6IjE5OTgiLCJnZW5kZXIiOiJub3REaXNjbG9zZWQiLCJpc3MiOiJodHRwczovL2FwaS5sb2dpbi55YWhvby5jb20iLCJwcm9maWxlX2ltYWdlcyI6eyJpbWFnZTY0IjoiaHR0cHM6Ly9zLnlpbWcuY29tL2FnL2ltYWdlcy9kZWZhdWx0X3VzZXJfcHJvZmlsZV9waWNfNjRzcS5qcGciLCJpbWFnZTE5MiI6Imh0dHBzOi8vcy55aW1nLmNvbS9hZy9pbWFnZXMvZGVmYXVsdF91c2VyX3Byb2ZpbGVfcGljXzE5MnNxLmpwZyIsImltYWdlMTI4IjoiaHR0cHM6Ly9zLnlpbWcuY29tL2FnL2ltYWdlcy9kZWZhdWx0X3VzZXJfcHJvZmlsZV9waWNfMTI4c3EuanBnIiwiaW1hZ2UzMiI6Imh0dHBzOi8vcy55aW1nLmNvbS9hZy9pbWFnZXMvZGVmYXVsdF91c2VyX3Byb2ZpbGVfcGljXzMyc3EuanBnIn0sImdpdmVuX25hbWUiOiJBYmhpbmF2IiwibWlkZGxlX25hbWUiOiIiLCJsb2NhbGUiOiJlbi1VUyIsInBpY3R1cmUiOiJodHRwczovL3MueWltZy5jb20vYWcvaW1hZ2VzL2RlZmF1bHRfdXNlcl9wcm9maWxlX3BpY18xOTJzcS5qcGciLCJzaWQiOiJncU1BZHN3eWNlWFQiLCJhdWQiOiJkajB5Sm1rOU1UTjRTbU5rVFVkMFdFWkVKbVE5V1Zkck9WbHFUazloYlZKT1VXczRiV05IYnpsTlFUMDlKbk05WTI5dWMzVnRaWEp6WldOeVpYUW1jM1k5TUNaNFBXRm0iLCJhdXRoX3RpbWUiOjE2Mzg4NjI5MTYsIm5pY2tuYW1lIjoiQWJoaW5hdiIsIm5hbWUiOiJBYmhpbmF2IFNoYXJtYSIsInNlc3Npb25fZXhwIjoxNjQwMDcyNTE2LCJleHAiOjE2Mzg4NjY1MTcsImFwcF9pZCI6ImRqMHlKbWs5TVRONFNtTmtUVWQwV0VaRUptUTlXVmRyT1ZscVRrOWhiVkpPVVdzNGJXTkhiemxOUVQwOUpuTTlZMjl1YzNWdFpYSnpaV055WlhRbWMzWTlNQ1o0UFdGbSIsImlhdCI6MTYzODg2MjkxNywiZmFtaWx5X25hbWUiOiJTaGFybWEiLCJlbWFpbCI6ImFiaGluYXYyMzZzaGFybWFAeWFob28uY29tIn0.eFtw875qj1m96uMPDJXr4b9qbcJ5hdNinGJFbw1KiiLpFGRhsgIK6GkEux_uKKU-gHjqJjFd1oau5P21jKdhDQ",
    "Refresh_token": "AIb5rmG2Vaw6BIzD6..w.n5mV5Px7QenSnALZAJafc6O2yD7M2dn1p8I",
    "token_type": "bearer"
}
You can use a localhost URL to validate your implementation:
https://127.0.0.1:5000/dashboard?code=yxwcp9xf4a3nwjszf9n826jp5gx5qpbw
4. Fetch user information using the Get User Info API
@app.route("/get_user_info")
def get_user_info():
    access_token = response.json()['access_token']
    headers1 = {
        'Authorization': f'Bearer {access_token}',
        'Accept': 'application/json',
        'Content-Type': 'application/json'
    }
    response1 = get(base_url + 'openid/v1/userinfo', headers=headers1)
    response1.ok
    return response1.json()
This GET request should return a JSON response with the following format:
{
    "birthdate" = "xxxx",
    "email" = "xxxx@yahoo.com",
    "email_verified" = true,
    "family_name" = "xxxx",
    "gender" = "xxxx",
    "given_name" = "xxxx",
    "locale" = "en-US",
    "name" = "xxxx",
    "nickname" = "xxxx",
    "picture" = "https://s.yimg.com/ag/images/default_user_profile_pic_192sq.jpg",
    "profile_images" =     {
        image128 = "https://s.yimg.com/ag/images/default_user_profile_pic_128sq.jpg",
        image192 = "https://s.yimg.com/ag/images/default_user_profile_pic_192sq.jpg",
        image32 = "https://s.yimg.com/ag/images/default_user_profile_pic_32sq.jpg",
        image64 = "https://s.yimg.com/ag/images/default_user_profile_pic_64sq.jpg",
    },
    "sub" = "xxxx"
}
5. When the Access Token expires, exchange the Refresh Token for a new Access Token
@app.route("/refresh")
def refresh_tokens():
    refresh_token = response.json()['refresh_token']
    encoded = base64.b64encode((client_id + ':' + client_secret).encode("utf-8"))
    headers = {
        'Authorization': f'Basic {encoded.decode("utf-8")}',
        'Content-Type': 'application/x-www-form-urlencoded'
    }
    data = {
        'grant_type': 'refresh_token',
        'redirect_uri': redirect_uri,
        'refresh_token': refresh_token
    }
    response2 = post(base_url + 'oauth2/get_token', headers=headers, data=data)
    return response2.json()
6. FAQ
Q. Do I need to enable HTTPS on my local environment when locally testing my application with the Yahoo Authorization Server?
A. Yes, you do. We recommend using one of the following code snippets:
if __name__ == '__main__':
    app.run(debug=True, ssl_context='adhoc')
or
if __name__ == '__main__':
    context = ('local.crt', 'local.key' ) #certificate and key files
    app.run(debug=True, ssl_context=context)
Please refer to the following error codes and explanations when troubleshooting OAuth 2.0 errors:
400 Errors
A 400 Error indicates that a request is invalid. You omitted a required parameter or Yahoo couldn’t make sense of a parameter you supplied.
| Error | Description |
|---|---|
UNSUPPORTED_OVER_HTTP | OAuth 2.0 only supports calls over HTTPS. |
VERSION_REJECTED | An unsupported version of OAuth was supplied. |
PARAMETER_ABSENT | A required parameter is missing from the request. |
PARAMETER_REJECTED | A provided parameter is too long. |
INVALID_CLIENT | An invalid Client ID was provided. |
INVALID_REQUEST | An invalid request parameter was provided. |
UNSUPPORTED_RESPONSE_TYPE | The provided response_type is supported for this request. You may have provided a response type that doesn’t match the request. |
UNSUPPORTED_GRANT_TYPE | The provided grant_type is not supported. You may have provided a grant type that doesn’t match the request. |
INVALID_REDIRECT_URI | The provided redirect_URI does not match the one provided with the original authorization request. |
UNSUPPORTED_REDIRECT_URI | The provided redirect_URI is not supported for this request type. |
INVALID_PARAM | A provided request parameter is invalid. |
INVALID_REFRESH_TOKEN | The provided refresh token is invalid. |
401 Errors
A 401 error indicates that the authorization information for a request is absent or invalid.
| Error | Description |
|---|---|
TOKEN_EXPIRED | The provided refresh token has expired. |
INVALID_CALLBACK | The redirect_uri provided with this request uses an unsupported port or does not match the Client ID (Consumer Key). |
UNDERAGE_USER | The user who must authorize access is a minor and cannot authorize access. |
INVALID_CLIENT_SECRET | An invalid Client Secret was provided. |
INVALID_GRANT | An invalid or expired token was provided. |
403 Errors
A 403 error indicates that request is forbidden.
| Error | Description |
|---|---|
ACCOUNT_NOT_AUTHORIZED | The user has not authorized requesting Client ID (Consumer Key). |
Authorization Errors
The following errors presented on the browser when user authorizes the app.
- INTERNAL_ERROR
- INVALID_CONSUMER_KEY
- DELETED_CONSUMER_KEY
- DISABLED_CONSUMER_KEY
- INVALID_TOKEN
- EXPIRED_TOKEN
- INVALID_CALLBACK_URL
- INVALID_SCOPE
- UNSUPPORTED_OVER_HTTP
- UNDERAGE_USER
- PARAMS_MAXLENGTH_EXCEEDED
- BAD_REDIRECT_URI
- INVALID_RESPONSE_TYPE
- INVALID_REQUEST
- PARAM_TOO_LONG
The API Endpoint: https://api.login.yahoo.com/openid/v1/userinfo
The OpenID Connect UserInfo specification: https://openid.net/specs/openid-connect-core-1_0.html#UserInfo
You can use the UserInfo endpoint to fetch the user information for an authenticated user. To fetch the information of the authenticated user, you should invoke the UserInfo request using either HTTP GET or HTTP POST with the Access Token obtained from the OAuth /get_token API. When using the HTTP GET method (RECOMMENDED), the access token must be passed in the HTTP Authorization header as a Bearer token. If you are using the HTTP POST method, then you could either use the Authorization header or put the Access Token in the access_token field of your request body.
Sample Request:
GET /openid/v1/userinfo HTTP/1.1
Host: api.login.yahoo.com
Authorization: Bearer SlAV32hkKG
Sample Response:
HTTP/1.1 200 OK
Content-Type: application/json
{
    "sub": "FSVIDUW3D7FSVIDUW3D72F2F", # user identifier
    "name": "Jane Doe",
    "given_name": "Jane",
    "family_name": "Doe",
    "preferred_username": "j.doe",
    "email": "janedoe@example.com",
    "picture": "http://example.com/janedoe/me.jpg"
}
Error Response:
When an error condition occurs, the UserInfo Endpoint returns an Error Response as defined in Section 3 of OAuth 2.0 Bearer Token Usage [RFC6750]. (HTTP errors unrelated to RFC 6750 are returned to the User Agent using the appropriate HTTP status code.) In addition to the errors defined in RFC 6750, the API also returns the following transport related errors.
429 Too Many Requests - This error is returned if the load generated by the client is too high
5XX - The server is incapable of serving the request. Please try again later.
The following is a non-normative example of a UserInfo Error Response:
HTTP/1.1 401 Unauthorized
WWW-Authenticate: error="invalid_token",
error_description="The Access Token expired"
The 429 response:
HTTP/1.1 429 Too Many Requests
WWW-Authenticate: error="EXCEEDED_PER_CLIENT_LIMIT",
error_description="Too many user info requests”
The ID Token is a security token that contains Claims (fields in token) about the user being authenticated. The Claims contains information such as the issuer, the expiration timestamp, subject identifier, nonce, and other fields depending on the scopes you requested.
We’re going to look at the format of an ID Token (JSON Web Token or JWT) and then examine what comprises the JWT: JOSE header, payload, and signature. At the end of the chapter, we’ll learn to decode and validate ID Tokens.
ID Token as a JSON Web Token (JWT)
The ID Token is represented as a JSON Web Token (JWT). The JWT is signed using a JSON Web Signature (JWS) and consists of three parts separated by ‘.’ (period).
An ID Token has the following syntax:
Base64(JOSE header).Base64(Payload).Base64(Signature)
JOSE Header
The JOSE header contains information regarding the signing algorithm. The JOSE header has the following fields:
alg- Identifies the cryptographic algorithm used to secure the JWS.kid- The hint indicating which key was used to secure the JWS.
JOSE Header Example
In the example below, the value of the alg parameter "ES256". This indicates that the digital signature is encoded using the Elliptic Curve Digital Signature Algorithm (ECDSA) with the P-256 curve and the SHA-256 cryptographic hash function. See Creating a JWS with ECDSA P-256 SHA-256, ECDSA P-384 SHA-384, or ECDSA P-521 SHA-512 and Additional Algorithms for more information.
{
    "alg":"ES256",
    "kid":"87350ad9ce04550819b62079b193a42055a36b71"
}
ID Token Payload
The payload contains Claims about the authentication event. The following JSON fields are contained in the payload.
iss- (Issuer) The Issuer Identifier for the Issuer of the response. Clients must validate that the value is equal tohttps://api.login.yahoo.com.sub- (Subject) The unique user identifier.aud- (Audience) The value of the Client’s ID (client_id). Clients must verify that it is equal to their Client ID.exp- (Expiration Time) The expiration for the ID Token. Clients must verify that this expiry time has not passed.iat- (Issued At) The issue time for the ID Token.nonce- The nonce passed as a parameter during authorization.at_hash- (Access Token Hash Value) The Access Token hash (if issued with the flow), which can be used to mitigate cross-site request forgery (CSRF).
Additional Claims
Additional Claims may not be needed for SSO but can assist in creating a user account. Yahoo only returns additional Claims for the profile scope.
For the basic profile scope sdps-r, the following additional Claims are returned.
name- the full name of the usergiven_name- the first name of the userfamily_name- the last name of the userlocale- the preferred locale of the user
The extended profile scope sdpp-w, in addition to the Claims given above, also returns the following Claims:
email- the email ID of the useremail_verified- the Boolean flag letting Clients know if the given email address has been verified by Yahoo.
ID Token Payload Example
The example ID Token payload below, in addition to the Claims about the authentication event, also includes user information such as the user’s name and email address. These additional Claims were included because the read-write scope to the Profiles API (sdpp-w) was sent with the authentication request to Yahoo: scope=openid sdpp-w
{
    "sub": "MCX7TR7RTB5L3YRYR4FIAKX2IE",
    "aud": "dj0yJmk9NDdXZzBEcmJ6UjJxJmQ9WVdrOVlVWktjR0ZLTkdFbWNHbzlNQS0tJnM9Y29uc3VtZXJzZWNyZXQmeD04OQ--",
    "email_verified": true,
    "iss": "https://api.login.yahoo.com",
    "name": "Jasmine Smith",
    "exp": 1440569876,
    "locale": "en-US",
    "given_name": "Jasmine",
    "nonce": "YihsFwGKgt3KJUh6tPs2",
    "iat": 1440566276,
    "family_name": "Smith",
    "email": "jasmine_smith@yahoo.com"
}
Signature
The last part of the ID Token is the digital signature, which is generated for the JOSE header and payload data (Base64(JOSE header).Base64(Payload)). Clients must validate the signature and return an error if the validation fails. To validate the signature, clients should fetch public keys from the keys endpoint. The endpoint is available from the jwks_uri field in the Yahoo Discovery document. We’ll learn to validate the signature in Validate the ID Token.
Decoding Example
We’re going to decode the following ID Token:
id_token=eyJhbGciOiJFUzI1NiIsImtpZCI6IjM0NjZkNTFmN2RkMGM3ODA1NjU2ODhjMTgzOTIxODE2YzQ1ODg5YWQifQ.eyJhdWQiOiJkajB5Sm1rOWJrMTVhM0ZYVjJ0NWNEbHRKbVE5V1Zkck9WbFZNWFJrYmtJMVRsUkJiV05IYnpsTlFTMHRKbk05WTI5dWMzVnRaWEp6WldOeVpYUW1lRDA0TUEtLSIsInN1YiI6IlVRSURXSk5XVk5RRDRHWFo1TkdNWlVTVFE0IiwiaXNzIjoiaHR0cHM6Ly9sb2dpbi55YWhvby5jb20iLCJleHAiOjE0NDQ2OTcwNDUsIm5vbmNlIjoiWWloc0Z3R0tndDNLSlVoNnRQczIiLCJpYXQiOjE0NDQ2OTM0NDV9.XiyNdHHHoYqarDZGkhln5sF_SQNNVvV67SZsFAk7yo8NreJjzVw7LmtkwpiUQe87-Km39PeIwf1W_PqEH9RqjA"
First, extract the encoded JOSE header, the payload, and the signature by splitting the ID Token string on “.”:
jose_header = "eyJhbGciOiJFUzI1NiIsImtpZCI6IjM0NjZkNTFmN2RkMGM3ODA1NjU2ODhjMTgzOTIxODE2YzQ1ODg5YWQifQ"

payload = "eyJhdWQiOiJkajB5Sm1rOWJrMTVhM0ZYVjJ0NWNEbHRKbVE5V1Zkck9WbFZNWFJrYmtJMVRsUkJiV05IYnpsTlFTMHRKbk05WTI5dWMzVnRaWEp6WldOeVpYUW1lRDA0TUEtLSIsInN1YiI6IlVRSURXSk5XVk5RRDRHWFo1TkdNWlVTVFE0IiwiaXNzIjoiaHR0cHM6Ly9sb2dpbi55YWhvby5jb20iLCJleHAiOjE0NDQ2OTcwNDUsIm5vbmNlIjoiWWloc0Z3R0tndDNLSlVoNnRQczIiLCJpYXQiOjE0NDQ2OTM0NDV9"

signature = "XiyNdHHHoYqarDZGkhln5sF_SQNNVvV67SZsFAk7yo8NreJjzVw7LmtkwpiUQe87-Km39PeIwf1W_PqEH9RqjA"
Use a Base64 library to decode the strings. You can use https://www.base64decode.org/ to help you decode the strings for this tutorial:
Thejose_header = { "alg":"ES256", "kid":"3466d51f7dd0c780565688c183921816c45889ad" } payload = { "aud":"dj0yJmk9bk15a3FXV2t5cDltJmQ9WVdrOVlVMXRkbkI1TlRBbWNHbzlNQS0tJnM9Y29uc3VtZXJzZWNyZXQmeD04MA--", "sub":"UQIDWJNWVNQD4GXZ5NGMZUSTQ4", "iss":"https://api.login.yahoo.com", "exp":1444697045, "nonce":"YihsFwGKgt3KJUh6tPs2", "iat":1444693445 } signature = "XiyNdHHHoYqarDZGkhln5sF_SQNNVvV67SZsFAk7yo8NreJjzVw7LmtkwpiUQe87-Km39PeIwf1W_PqEH9RqjA"algHeader Parameter is “ES256”, so you would validate the ECDSA P-256 SHA-256 digital signature contained in the JWS Signature.- Congratulations, you have decoded your ID Token.
Validate the ID Token
After decoding your ID Token, you will still need to validate it. Because the validation of an ID Token depends on an expiration time, instead of walking through an example, we’re going to instead provide you with validation steps.
Get the Public Keys
You’ll need the public keys from Yahoo to validate the signature. Make a GET request to the URL given by the
jwks_uriparameter in the Yahoo Discovery document. In the returned JSON, you’ll see the arraykeyscontaining objects.Find the Matching Public Keys
In the
keysarray, find the object with thekidandalgfields that have the same values as those in the JOSE header of your ID Token. Copy the object as we’ll be using its fields to validate the signature.Determine the Cryptographic Algorithm
The
algfield specifies the cryptographic library to use. For example, if the value for thealgfield is “ES256”, you would validate the signature using the cryptographic library function for ECDSA P-256 SHA-256.Validate the Signature
Use one of the available cryptographic libraries to validate the signature.
For example, if you were using the library Nimbus OAuth 2.0 SDK with OpenID Connect extensions (Java) to validate the signature, you would get the
xandyvalues from the public keys (see step 2) and use something similar to the code below.public boolean validateECDSASignatureWithNimbus(String x, String y) throws Throwable { JWSVerifier verifier = new ECDSAVerifier(new BigInteger(1, Base64.decodeBase64(x)), new BigInteger(1, Base64.decodeBase64(y))); return SignedJWT.parse(idToken).verify(verifier); }Check the Expiration
You’ll need confirm that the token has not expired by looking at the value of the
expfield in your ID Token. Confirm that the current UNIX time has not exceeded the value of theexpfield.Confirm the Client ID
The
audfield of your ID Token must match the Client ID of the application you created on YDN.Verify the Issuer is Correct
Issuer is the Entity (in this case, Yahoo) who set the Claims. Thus, the value of the
issfield in the ID token must be equal tohttps://api.login.yahoo.com.Verify the Nonce is the Same
The
noncevalue returned in the ID Token should be the same as the value of thenonceparameter you transmitted to the authorization endpoint. This is to verify that you, and not someone else, initiated the request for the ID Token.Use the Claims of the ID Token
After all the validations are successful, you can consume the Claims about the authenticated user from the ID Token.
Resources


Equal prominence
The Yahoo sign-in button must be displayed with equal prominence to other third party sign-in buttons.
Art + alterations
Please do not alter the button art or logos.
We understand that there may be one-off cases where site or app style demands slight modifications. But whenever possible, please use the assets as provided.
Should a special case arise, please contact purple@yahooinc.com.
Size
Scale the button as needed for different devices and screen sizes, but please preserve the aspect ratio of the button. We don’t want to stretch or squash the Yahoo logo, or any other art within the button.
Call-to-action text
When possible, include accompanying call-to-action text. E.g. “Sign in with Yahoo,” “Sign up with Yahoo” or “Continue with Yahoo.”
It's OK if the site or app style doesn't allow for accompanying text. But for clarity, use accompanying text when possible.
Offer login & account creation option early
Deploy the button as early as you can within the user flow of the site or app. We want users to know they can gain immediate access to digital experiences through Yahoo.
Unique or special circumstances
Some sites have third party sign-in buttons that are just a company logo. If that’s the case, download one here.
A button like this wouldn’t be our first choice. But if it’s what the site or app style demands, do your best.
A few more things:
Don’t create your own button.
Don’t create your own Yahoo logo for the existing buttons.
Don’t use or create a “Y!” to represent the Yahoo logo.
For all other branding questions, email purple@yahooinc.com
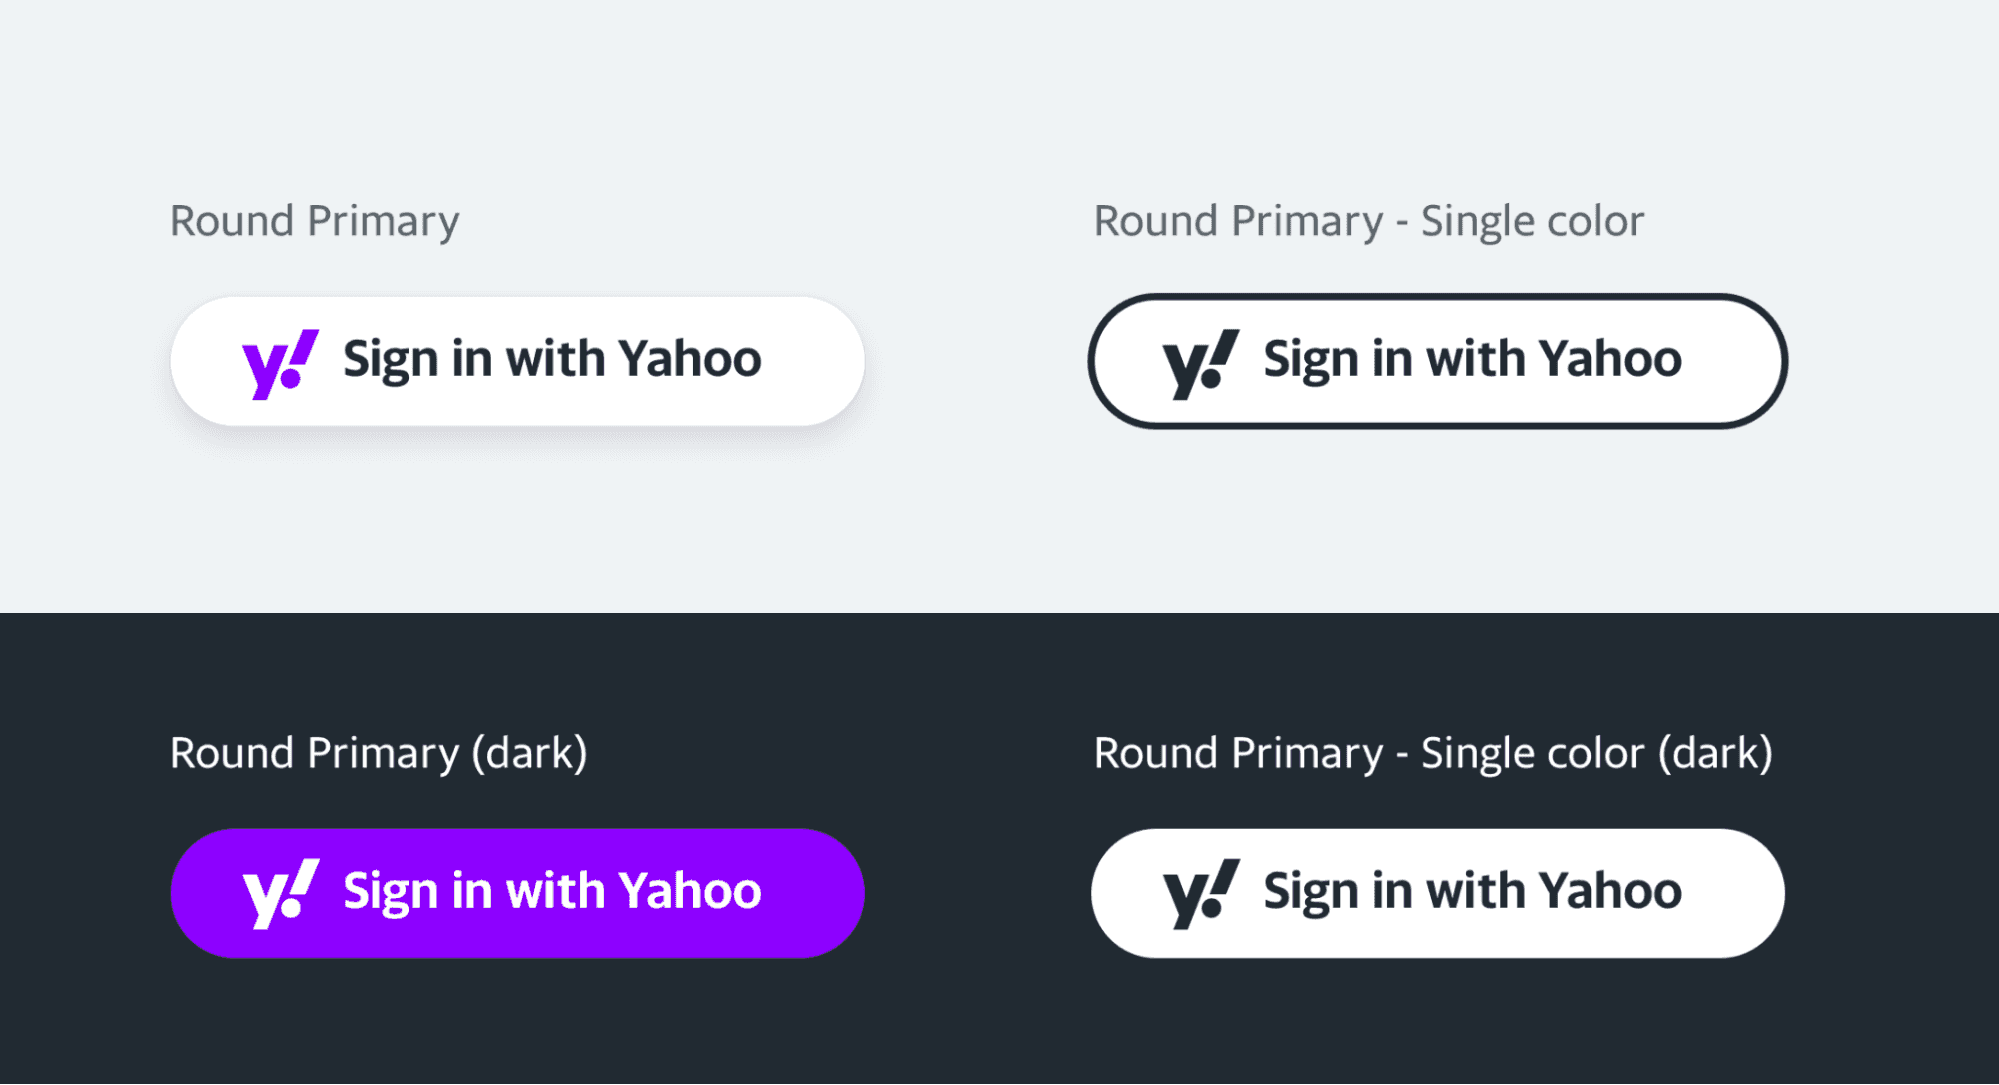
Color
Rounded primary
The logo is #7E1FFF. The copy is #232A31. For the shadow details, download the sketch file here.
Rounded primary (single color)
The outline, copy and logo is #232A31.
Rounded primary (dark)
The background of the button is #7E1FFF, the copy and logo is #FFFFFF.
Rounded primary (single color + dark)
The background of the button is #FFFFFF, the logo and copy is #232A31.
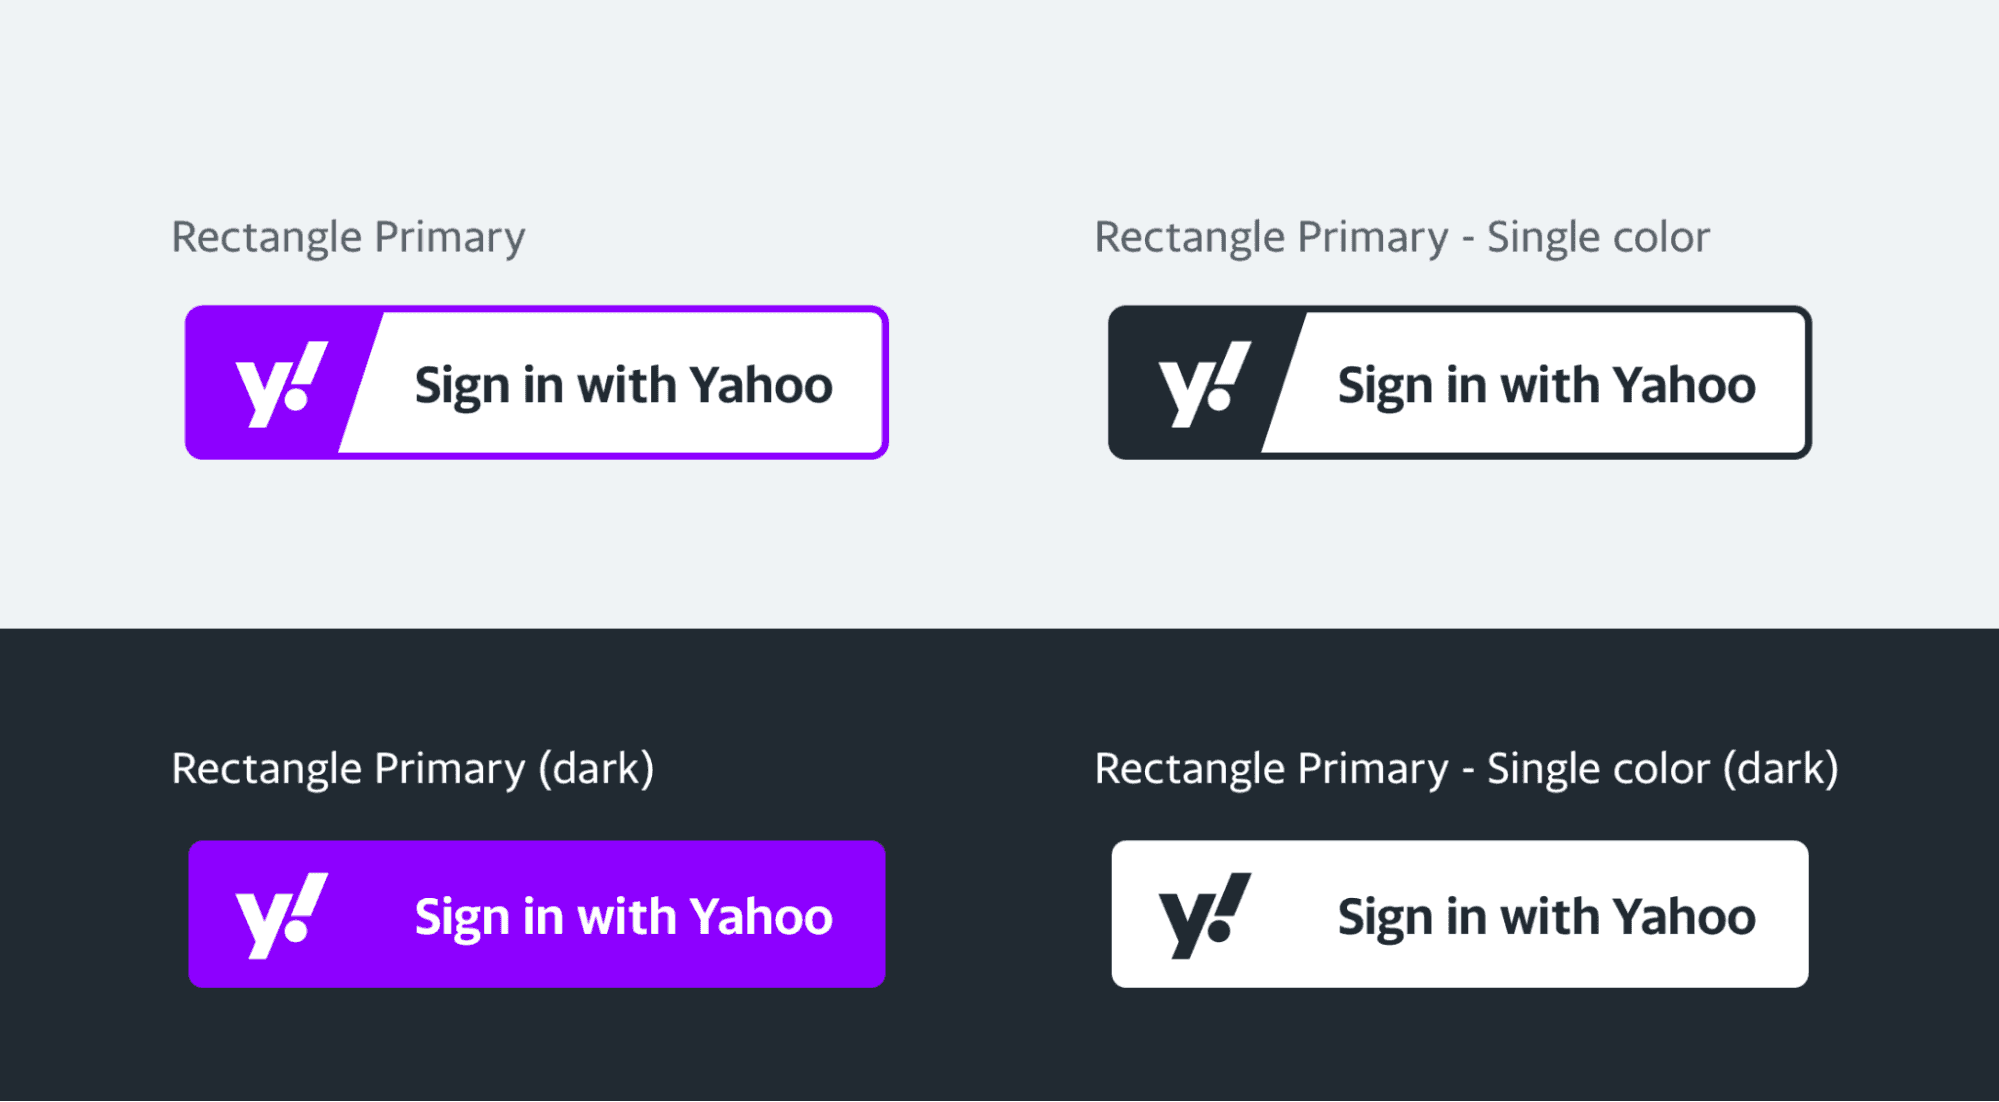
Rectangular primary
The rule and fill is #7E1FFF. They copy is #232A31.
Rectangular primary (single color)
The rule, copy and fill #232A31.
Rectangular primary (dark)
The background of the button is #7E1FFF, the copy and logo is #FFFFFF.
Rectangular primary (single color + dark)
The background of the button is #FFFFFF, the logo and copy is #232A31.
Font
The font that makes up the button copy is Yahoo Sans Semibold. Download here.
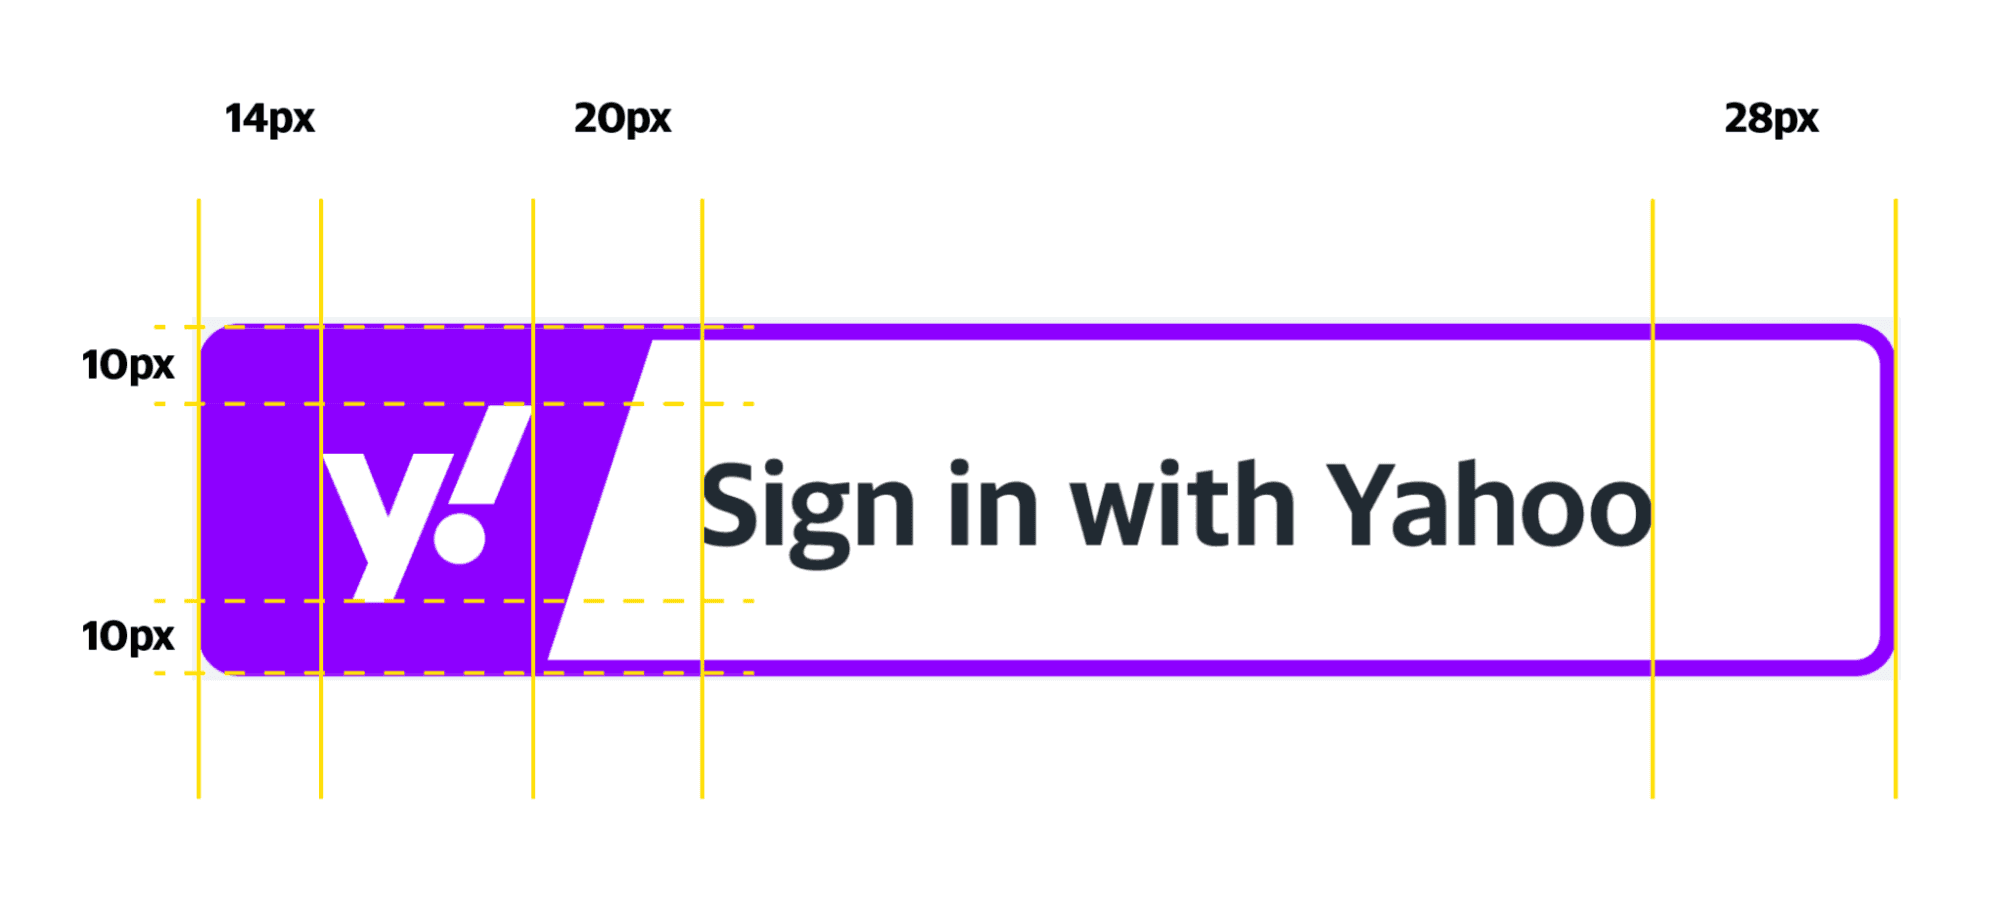
Padding
Rounded


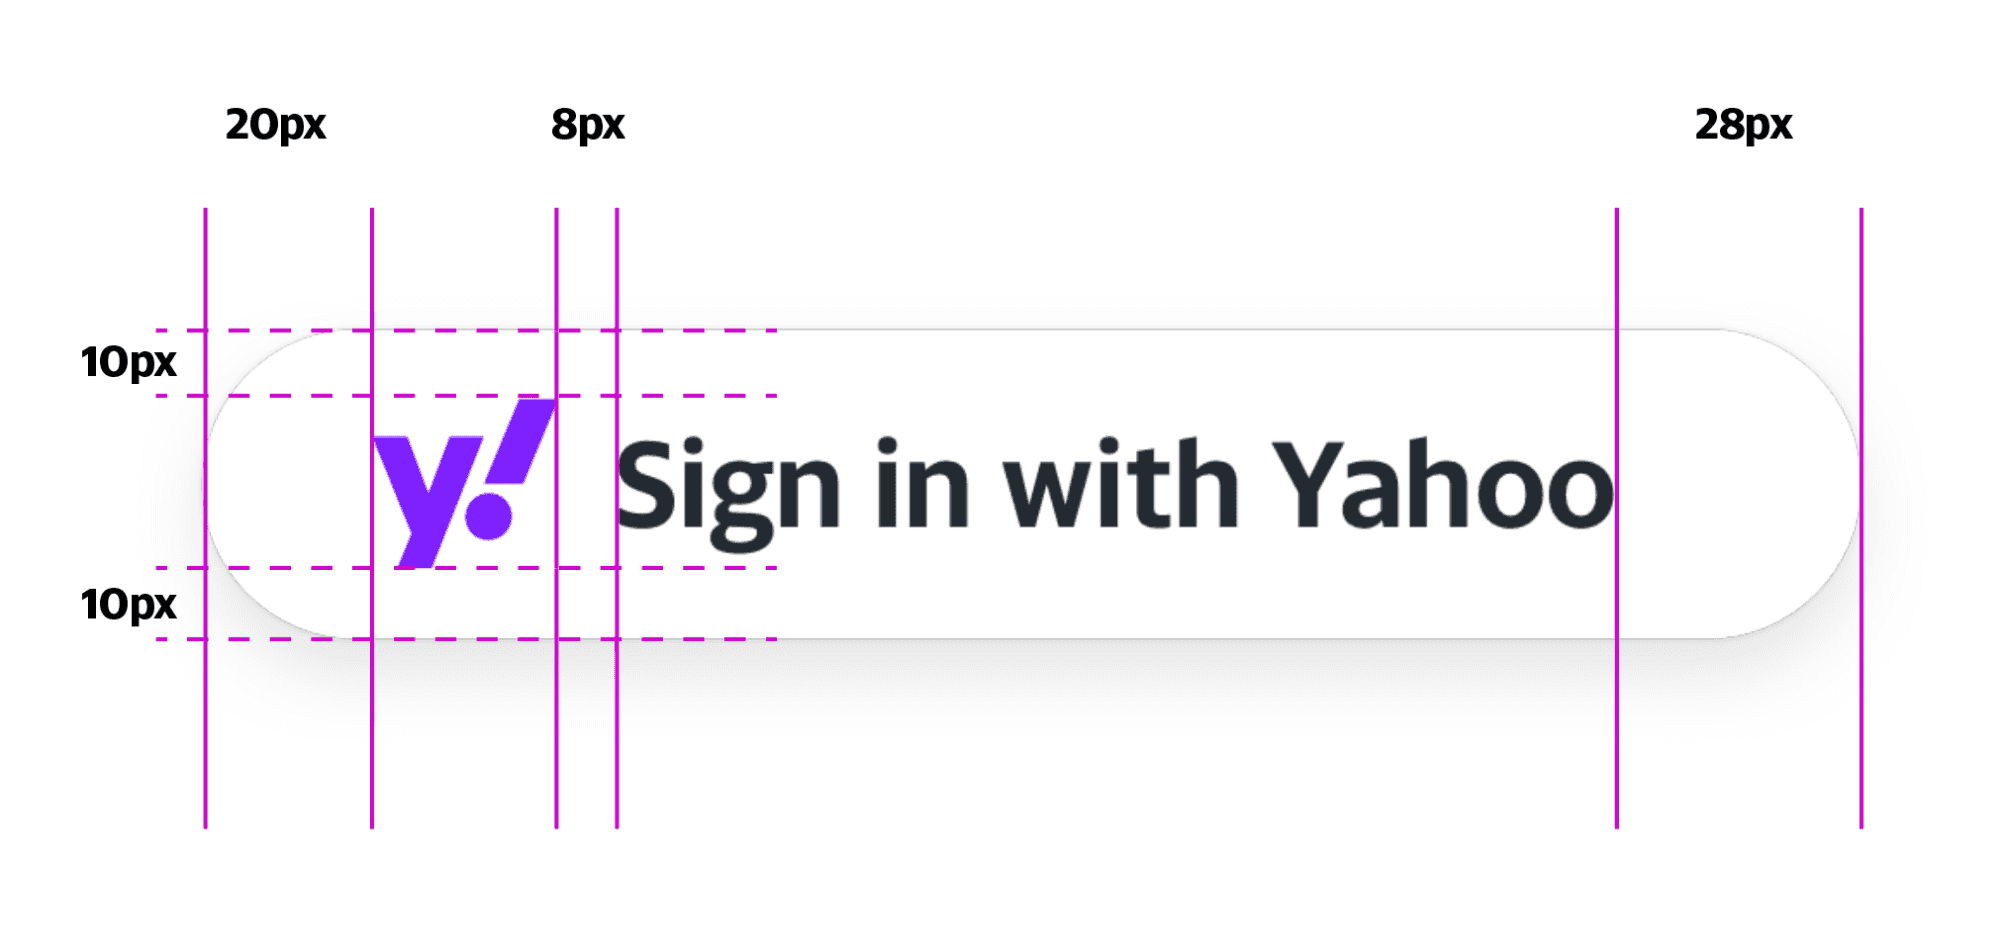
Rectangular


For general questions about Sign In With Yahoo or for help with troubleshooting errors, please send an email to siwy@yahooinc.com.
For Mail related inquiries/data requests please refer to: https://senders.yahooinc.com/developer/developer-access/.