5. Getting Data
Introduction
As with other MVC-based frameworks, you use models to get data although Mojito allows controllers to directly fetch content as well. Thus far, our applications have been just getting static data from the model, but in this module we’re going to learn how to get data in a couple of different ways. The recommended way in Mojito is to use YQL, an SQL-like language and Web Service that allows you to make queries on Web data. You can also use the REST module that comes with Mojito to make HTTP calls to Web services.
We’re going to use YQL to get GitHub data into our application, but we’ll present an example of how to use the Y.mojito.lib.REST Class to make REST calls. We’re going to add another mojit to get Twitter data with the help of the Node.js module simple-twitter.
Time Estimate
20 minutes
What We’ll Cover
- mojit models
- YQL and how to use it to get data
- accessing and calling model methods from the controller
- using the Y.mojito.lib.REST class to make REST calls
- using other forms of data such as query string parameters.
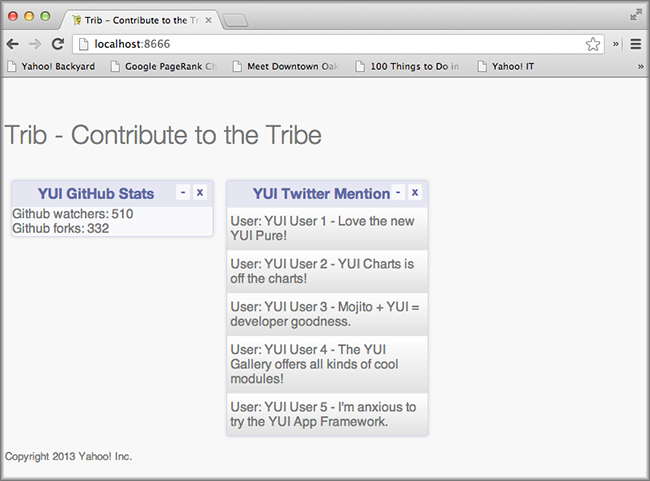
Final Product
In the screenshot, you can see we’ve added a mojit for Twitter data and that we finally have live data for our GitHub statistics.
Before Starting
Review of the Last Module
In the last module, we discussed composite mojits, showing how to configure the parent-child relationship between mojits and then use the Composite addon to execute child mojits. Using composite mojits, we were able to create a page layout and add content to the body of the HTML page. We also kept our frame mojit to create the HTML page for use. In summary, we covered the following:
- configuring composite mojits
- using the Composite addon
- ac.composite.done versus ac.composite.execute
- parent mojit templates
Setting Up
- $ cp -r 04_composite_mojits 05_getting_data
To get live Twitter data for your application:
Create a Twitter application to get OAuth keys from Twitter. You’ll need a consumer key, consumer secret, access token key, and access token secret.
Add the simple-twitter module as a dependency in package.json. We’ll be using the simple-twitter module to make OAuth-authorized REST calls to the Twitter Search API.
...
  "optionalDependencies": {
    "simple-twitter": "~1.0.0"
  },
...
From the application directory, install the dependencies: $ npm install
Lesson: Getting Data
Introduction
Mojito separates the data layer with models that can use the Mojito REST library or YQL. In most cases, we recommend YQL because you can have a consistent API to get data from different sources and can filter results with YQL statements. The response that is returned from YQL is also more consistent regardless of the data sources, making it easier to parse. The YQL Web Service is also optimized to get data to you faster, and YUI has a handy YQL module that makes using YQL even easier. We’re going to provide an overview of YQL, show you how to form YQL statements, and finally how to use YUI’s YQL Query module.
Models
We briefly went over the structure of models in the Mojits module when we discussed mojit MVC. Mojito models, like controllers, are just YUI modules, but use a different namespace than controllers. With that in mind, let’s just summarize some of the important points about mojit models.
Location
The location of models are in the models directory under the mojit directory. So, if your mojit is myMojit, the models would be found in myMojit/models.
File Naming Convention
The file name of a model has two parts. The model name and the affinity. The model name is an arbitrary string, and the affinity, as we have said before, indicates where the code is running. The affinity may be server, client, or common, where common indicates the code can run on either the server or client. Thus, the syntax of the model file name is the following: {model_name}.{affinity}.js
Models as YUI Modules
Models like controllers are registered with YUI as modules with YUI.add, have their own namespace, and list dependencies in the requires array.
Below is the skeleton of the model. Notice that we have required the yql module. This is the main way for getting data. If you haven’t heard of or used YQL before, don’t worry, we’ll give you a little primer before writing code to get data with YQL in the next section.
YUI.add('yql', function(Y, NAME) {

  // The namespace for the model that passes the
  // name
  Y.mojito.models[NAME] = {
    init: function(config) {
      this.config = config;
    },
    getData: function(params, callback) {
      // Model function to get data...
    },
    ...
  };
}, '0.0.1', {requires: ['yql']});
YQL Primer
What is YQL?
If you know SQL, then think of YQL as SQL for the Internet, with the Internet representing a MySQL database. In reality, Internet data can only be fetched by the YQL Web Service if there is a table that defines how data is accessed. YQL comes with a wide range of built-in tables, and the developer community has contributed YQL Open Data Tables (ODT) as well. The table tells YQL how to get the Web data, and the YQL statement (like an SQL query) tells YQL what data to get from that table and how to filter that data. If you have questions, take a look at the YQL Guide.
YQL Statements
The YQL language, like SQL, has many verbs for reading and writing data. For our application, we’ll be just reading data with the SELECT verb. To filter data, like SQL, you use the key word WHERE. YQL also includes operators such as LIKE for filtering, the key word LIMIT to limit the number of results, and the pipe (|) to filter results through a function such as SORT. We can’t possibly cover all of the features of YQL here, but an example YQL statement can certainly show you many of the features that we’ve just discussed:
select Title, Rating.AverageRating from local.search(20) where query="pizza" and city="New York" and state="NY" | sort(field="Rating.AverageRating") | reverse()
Try running the local search query above in the YQL Console to see the results returned by YQL.
YQL Web Service
To use YQL, you make an HTTP request to the YQL Web Service. You use one of the YQL Web Service URLs and append the YQL statement to the query parameter q. The YQL Web Service has a couple URLs for getting public and authorized data:
- Public Data: http://query.yahooapis.com/v1/public/yql
- Public/Private (OAuth authorized): http://query.yahooapis.com/v1/yql
So, if you wanted to make the query select * from local.search where query=”pizza”, you would make an HTTP GET call to the following URL: http://query.yahooapis.com/v1/public/yql?q=select * from local.search where query=”pizza”
Fortunately, YUI’s YQL module forms the URL and makes the call for you, so you just need to form the YQL statement. With that being said, let’s look at the YQL module.
YQL Query Module
To use the YQL Query module in a mojit model, you simply add the string "yql" to the requires array as shown below:
}, '0.0.1', {requires: ['yql']});
To use the module, you form the YQL statement using an existing table or a table that you have created and are hosting and then pass that statement and a callback function to Y.YQL. The yql module will make the REST call to the YQL Web service using the passed statement and your results will be returned to the callback.
In our application, we’ll be using YQL to get GitHub statistics. In the getData method of our model shown below, we’re using a custom table (thus, the use statement) that is appropos hosted on GitHub. The results are handled by the method onDataReturn.
getData: function(params, callback) {

   var yqlTable = 'https://raw.github.com/triptych/trib/master/src/yql/github.xml',
       query = "use '{table}' as yahoo.awooldri.github.repo; select watchers,forks from yahoo.awooldri.github.repo where id='yql' and repo='yql-tables'",
       queryParams = {
         table: yqlTable
       },
   cookedQuery = Y.substitute(query, queryParams);
   Y.YQL(cookedQuery, Y.bind(this.onDataReturn, this, callback));
},
onDataReturn: function (cb, result) {
    Y.log("onDataReturn called");
    if (typeof result.error === 'undefined') {
        var results = result.query.results.json;
        cb(results);
    } else {
       cb(result.error);
    }
}
Using the Mojito REST Module
The REST module for Mojito provides an easy make HTTP calls to Web services
To use the module, you add the string "mojito-rest-lib" to the requires array as shown below.
}, '0.0.1', {requires: [ 'mojito-rest-lib']});
The REST module allows you to make HTTP GET, HEAD, PUT, POST, and DELETE calls. The methods of the module all take the following parameters:
- url - The URL to make the HTTP call to.
- params - The parameters to add to the request.
- config - Configurations for the call, such as headers or timeout values.
- callback - The function that receives the response or error.
Using the REST module, the HTTP calls have the following syntax:
Y.mojito.lib.REST.{HTTP_VERB}}(uri, params, config, callback)
We won’t be using the REST module in this application because the Twitter Search API requires OAuth authorization, which is done more easily through a library such as simple-twitter. We’re going to just show you a simple example of using the REST module for your future reference.
In the getData method below, we pass our parameters to make the call to the Y! Groups page and return the JSON parsed results back with the callback.
YUI.add('groups-model', function(Y, NAME) {

  Y.namespace('mojito.models')[NAME] = {

    init: function(config) {
         this.config = config;
    },
    getData: function(callback) {
      var uri = "http://groups.yahoo.com" + "/search",
          params = { "query": "baking" };
      Y.mojito.lib.REST.GET(uri, params,null,function(err, response) {
        if (err) {
          callback(err);
        }
        callback(null, response._resp.responseText);
      });
    }
  };
}, '0.0.1', {requires: ['mojito-rest-lib']});
Using a Node.js Module to Get Twitter Data
After you have your OAuth keys and installed simple-twitter, you can use that module in your model to get Twitter data. Because Mojito runs on Node.js, you can use just about any npm module using the require method, which is what we’re going to do in the Twitter model.
To help explain the model code, let’s first just take a look at how to use the simple-twitter module. You require the module and save a reference to a variable. With that reference, you can instantiate an object with your Twitter OAuth keys that will allow you to make a REST call to their APIs.
var twitter = require('simple-twitter'),
    tweets = new twitter(
                     oauth.consumer_key,
                     oauth.consumer_secret,
                     oauth.access_token_key,
                     oauth.access_token_secret
     );
You append the HTTP method to the object and pass in the {endpoint}, such as search/tweets, the parameters, such as q=@yui, and a callback to handle the returned response.
tweets.get("{endpoint}", params, callback);
In our Twitter model shown below, we also use the YUI JSON module to help parse the returned results. In case you don’t want to get Twitter OAuth keys, we also provide mocked data.
YUI.add('twittersearch-model', function (Y, NAME) {
  Y.mojito.models[NAME] = {

    init: function (config) {
      this.config = config;
    },
    getData: function (count, q, oauth, cb) {
     // Confirm OAuth keys have been passed
      Y.log(oauth, "info", NAME);
      if (oauth) {
        var twitter = require('simple-twitter'),
            tweets = new twitter(
                     oauth.consumer_key,
                     oauth.consumer_secret,
                     oauth.access_token_key,
                     oauth.access_token_secret
            );
            tweets.get("search/tweets", "?q="+ encodeURIComponent(q) + "&count=" + count,
              function(error, data) {
                if(error) {
                  return cb(error);
                }
                cb(null, Y.JSON.parse(data));
              }
            );
            //  Use mock data if no OAuth keys have been provided
      } else {
          var mock_yui_data = { statuses: [ { from_user: "YUI User 1", text: "Love the new YUI Pure!" },
                                       { from_user: "YUI User 2", text: "YUI Charts is off the charts!" },
                                       { from_user: "YUI User 3", text: "Mojito + YUI = developer goodness." },
                                       { from_user: "YUI User 4", text: "The YUI Gallery offers all kinds of cool modules!" },
                                       { from_user: "YUI User 5", text: "I'm anxious to try the YUI App Framework." }
                                    ]};
          var mock_mojito_data = { statuses: [ { from_user: "Mojit User 1", text: "Mojits are self-contained MVC modules." },
                                       { from_user: "Mojito User 2", text: "The Data addon allows you to rehydrate data on the client!" },
                                       { from_user: "Mojito User 3", text: "Mojito + YUI = developer goodness." },
                                       { from_user: "Mojito User 4", text: "Mojito makes it easier to create pages for different devices." },
                                       { from_user: "Mojito User 5", text: "The Mojito CLI is now a separate package from Mojito." }
                                    ]};
          if ("@yuilibrary"==q) {
             cb(null, mock_yui_data);
          } else {
             cb(null, mock_mojito_data);
          }
      }
    }
  };
}, '0.0.1', {requires: ['mojito', 'mojito-rest-lib', 'json']});
Calling Model Methods From Controller
The controller brokers all requests, calling the model, and passing data back to the client or rendering templates with the data. The controller accesses and uses models much like it uses addons.
The controller needs to require the Models addon and use the method get from that addon to access a model. For example, for the controller shown below to get the model with the file name twitter.{affinity}.{selector}.js, the Models addon is required and then used to access and use the the model. In our application, the file will be twitter.server.js, but you could have a version for the client that uses the affinity client or you could have a model with a different selector that is chosen based on the context, which we’ll learn about in 9. Handlebars, Templates, and Custom Views, when we use selectors to choose the appropriate template for a client, such as an iPhone template or an Android template.
YUI.add('twitter', function (Y, NAME) {

  Y.namespace('mojito.controllers')[NAME] = {
    index: function (ac) {
      var q="@yuilibrary", oauth_keys, count=10;

      // Get Twitter API keys from your developer account (https://dev.twitter.com/apps) and
      // use the `oauth_keys` to hold your consumer key/secret and access token/secret.
      // If you leave `oauth_keys` undefined, your app will just use mocked data.
      /*
       * oauth_keys = {
       *    "consumer_key": "xxxx",
       *    "consumer_secret": "xxxx",
       *    "access_token_key": "xxxx",
       *    "access_token_secret": "xxxx"
       * }
      */
      // Get OAuth keys from definition.json to get real data.
      // If `oauth_keys==null`, use mock data from model.
      ac.models.get('twitter').getData(count, q, oauth_keys, function (err, data) {
        if (err) {
          ac.error(err);
          return;
        }
        // Add mojit specific CSS
        ac.assets.addCss('./index.css');
        ac.done({
          title: "YUI Twitter Mentions",
          results: data.statuses
        });
      });
    }
  };
}, '0.0.1', {requires: ['mojito', 'mojito-assets-addon', 'mojito-models-addon', 'mojito-params-addon']});
Creating the Application
After you have copied the application that you made in the last module (see Setting Up), change into the application 05_getting_data.
Let’s create the Twitter mojit that get Twitter data for us.
$ mojito create mojit Twitter
Change to the models directory of Twitter. We’re going to deal with getting Twitter data first.
Rename the file model.server.js to twitter.server.js and then change the registered module name from twitter-model to twittersearch-model.
Open twitter.server.js in an editor, and modify the method getData, so that it looks like the snippet below. As you can see, we use the simple-twitter module to make the REST calls to the Twitter Search API. We’ve also added mocked data for those who don’t want to open a Twitter developer account and get OAuth keys.
getData: function (count, q, oauth, cb) {
  // Confirm OAuth keys have been passed
  // You'll also need to add `simple-twitter: "~1.0.0"` to the `dependencies` object in
  // `package.json` and then run `npm install` from the application directory
  // to get the `simple-twitter` module that will call the Twitter Search API
  // If `oauth` is null, you'll be using the mocked data.
  Y.log(oauth, "info", NAME);
  if (oauth) {
    var twitter = require('simple-twitter'),
        tweets = new twitter(
            oauth.consumer_key,
            oauth.consumer_secret,
            oauth.access_token_key,
            oauth.access_token_secret
        );
    tweets.get("search/tweets", "?q="+ encodeURIComponent(q) + "&count=" + count,
      function(error, data) {
        if(error) {
          return cb(error);
        }
        cb(null, Y.JSON.parse(data));
      }
    );
    //  Use mock data if no OAuth keys have been provided
  } else {
    var mock_yui_data = { statuses: [ { from_user: "YUI User 1", text: "Love the new YUI Pure!" },
                           { from_user: "YUI User 2", text: "YUI Charts is off the charts!" },
                           { from_user: "YUI User 3", text: "Mojito + YUI = developer goodness." },
                           { from_user: "YUI User 4", text: "The YUI Gallery offers all kinds of cool modules!" },
                           { from_user: "YUI User 5", text: "I'm anxious to try the YUI App Framework." }
                         ]};
    var mock_mojito_data = { statuses: [ { from_user: "Mojit User 1", text: "Mojits are self-contained MVC modules." },
                              { from_user: "Mojito User 2", text: "The Data addon allows you to rehydrate data on the client!" },
                              { from_user: "Mojito User 3", text: "Mojito + YUI = developer goodness." },
                              { from_user: "Mojito User 4", text: "Mojito makes it easier to create pages for different devices." },
                              { from_user: "Mojito User 5", text: "The Mojito CLI is now a separate package from Mojito." }
                          ]};
     if ("@yuilibrary"==q) {
       cb(null, mock_yui_data);
     } else {
       cb(null, mock_mojito_data);
     }
  }
}
We also need to add the dependencies to use the REST and JSON modules:
}, '0.0.1', {requires: ['mojito', 'mojito-rest-lib','json']});
We need to modify the controller to use the model twitter.server.js. Open mojits/Twitter/controller.server.js in an editor, modify the index method so that it’s the same as that shown below. Make sure that the Models and Assets addon are required as well. The Models addon allows you to access our model and call the model function getData.
...
  ...
    index: function (ac) {
      var q="@yuilibrary", oauth_keys, count=10;

      // Get Twitter API keys from your developer account (https://dev.twitter.com/apps) and
      // use the `oauth_keys` to hold your consumer key/secret and access token/secret.
      // If you leave `oauth_keys` undefined, your app will just use mocked data.
      /*
       * oauth_keys = {
       *    "consumer_key": "xxxx",
       *    "consumer_secret": "xxxx",
       *    "access_token_key": "xxxx",
       *    "access_token_secret": "xxxx"
       * }
      */

      // Get OAuth keys from definition.json to get real data.
      // If `oauth_keys==null`, use mock data from model.
      ac.models.get('twitter').getData(count, q, oauth_keys, function (err, data) {
        if (err) {
          ac.error(err);
          return;
        }
        // add mojit specific css
        ac.assets.addCss('./index.css');
        ac.done({
          title: "YUI Twitter Mentions",
          results: data.statuses
        });
      });
    }
  };
}, '0.0.1', {requires: ['mojito', 'mojito-assets-addon', 'mojito-models-addon']});
Let’s replace the content of index.hb.html with the following while we’re here:
<div id="" class="mojit">
  <div class="mod" id="twitter">
    <h3>
      <strong></strong>
      <a title="minimize module" class="min" href="#">-</a>
      <a title="close module" class="close" href="#">x</a>
    </h3>
    <div class="inner">
      <ul>
      </ul>
    </div>
  </div>
</div>
Let’s turn our attention to the Github mojit. We have been waiting long enough to get GitHub data, but before we change any code, let’s rename the model file to yql.server.js. Now we can edit the file yql.server.js. Open the file in an editor, change the module name to stats-model-yql, update the getData function with the code below. Notice that we are using the YQL Open Data Table github.xml, which YQL allows you to use with the use statement.
YUI.add('stats-model-yql', function(Y, NAME) {

  Y.mojito.models[NAME] = {

    init: function(config) {
      this.config = config;
    },
    getData: function(params, callback) {
      var yqlTable = 'https://raw.github.com/triptych/trib/master/src/yql/github.xml',
          query = "use '{table}' as yahoo.awooldri.github.repo; select watchers,forks from yahoo.awooldri.github.repo where id='yql' and repo='yql-tables'",
          queryParams = {
            table: yqlTable
          },
          cookedQuery = Y.substitute(query, queryParams);
          Y.log("getData called");
          Y.log("cookedQuery:" + cookedQuery);
          Y.YQL(cookedQuery, Y.bind(this.onDataReturn, this, callback));
    },
    onDataReturn: function (cb, result) {
      Y.log("onDataReturn called");
      if (typeof result.error === 'undefined') {
        var results = result.query.results.json;
        Y.log("results.json:");
        Y.log(results);
        cb(results);
      } else {
        cb(result.error);
      }
    }
  };
}, '0.0.1', {requires: ['yql', 'substitute']});
Besides the YQL module, we also used the Substitute module, so make sure to add both of those modules to the requires array:
}, '0.0.1', {requires: ['yql', 'substitute']});
The Github controller needs to get the correct model. We’re also going to simplify the index function to only use the default template and add the mojito-assets-addon to the requires array. Modify the index function and the requires array so that they are the same as that below.
 ...
   index: function(ac) {

     var model = ac.models.get('yql');
     Y.log(model);
     model.getData({}, function(data){
       Y.log("githubmojit -index - model.getData:");
       Y.log(data);
       ac.assets.addCss('./index.css');
       ac.done({
         title: "YUI GitHub Stats",
         watchers: data.watchers,
         forks: data.forks
       });
     });
   }
 ...
}, '0.0.1', {requires: ['mojito', 'mojito-assets-addon','mojito-models-addon']});
Let’s update our template to look more like the Twitter template. So, go ahead and replace the content of index.hb.html with the following:
<div id="" class="mojit">
  <div class="mod" id="github">
    <h3>
      <strong></strong>
      <a title="minimize module" class="min" href="#">-</a>
      <a title="close module" class="close" href="#">x</a>
    </h3>
    <div class="inner">
      <div>Github watchers: <span></span></div>
      <div>Github forks: <span></span></div>
    </div>
  </div>
</div>
Because the Github mojit displays a title for the GitHub statistics. Let’s remove the title property passed to ac.composite.done in Body/controller.server.js and the Handlebars expression in the template Body/views/index.hb.html so they look like the following:
<div id="" class="mojit">
  <div class="bodyMojitStuff yui3-g-r">
    <div class="yui3-u-1-3">

    </div>
    <div class="yui3-u-1-3">
      </div>
    </div>
  </div>
</div>
Okay, we have Github mojit getting real data and even have a mojit for getting Twitter data. Did we forget anything? Yeah, we need to plug our Twitter mojit into the body by making it a child of the body instance. Let’s update the body instance in the application.json:
...
  "body": {
    "type": "Body",
    "config": {
      "children": {
        "github": {
          "type":"Github"
        },
        "twitter": {
          "type": "Twitter"
        }
      }
    }
  },
...
We’re going to need to update the path to our assets, but before we do that, let’s update the CSS file. Replace the contents of assets/trib.css with the following and then update the path in application.json to static/05_getting_data/assets/trib.css:
body {
    background-color: #F8F8F8;
    padding-left: 8px;
}
h1 {
    text-shadow: -2px -2px 3px #FFF;
}
.trib h1 {
    margin: 0px;
    text-align: center;
}
div.mod{
    background-color: #F9F9FC;
    border: 1px solid #D4D8EB;
    border-radius: 4px;
    box-shadow: 0 0 6px rgba(0,0,0,0.15);
    margin: 15px 8px;
    xpadding-bottom: 1px;
}
div.mod h3 {
    position: relative;
    background-color: #E5E6F1;
    border-radius: 4px 4px 0 0;
    color: #5E6BA4;
    font-weight: bold;
    font-size: 1.1em;
    margin: 0;
    padding: 4px 7px 5px;
}
div.mod h3 strong {
    font-weight: bold;
    padding-left: 25px;
    background-repeat: no-repeat;
    background-position: 2px;
}

/** for each mojit, add a bgimage for logo **/

div.mod h3 a.close,
div.mod h3 a.min,
div.mod h3 a.refresh {
    background-color: #F9F9FC;
    border:1px solid #E5E6F1;
    color: #5E6BA4;
    text-align: center;
    display: block;
    height: 19px;
    width: 17px;
    text-decoration: none;
    font-weight: bold;
    right: 4px;
    top: 1px;
    position: absolute;
    font-size: 80%;
    margin: 2px;
    padding: 0;
}
div.mod h3 a.min {
    right: 25px;
}
div.minned h3 a.min {
    right: 25px;
}
div.mod h3 a.refresh {
    right: 50px;
}
div.mod div.inner {
    overflow: hidden;
    xpadding-right: 8px;
}
div.inner ul {
    margin: 0;
    padding: 0;
}

div.inner ul li {
    list-style-type: none;
    margin: 0;
    padding: 8px 4px;
    border-top: 1px solid #ececec;
}
div.inner ul li a {
    text-decoration: none;
    color: #000;
}

div.inner ul li {
    background: rgb(255,255,255); /* Old browsers */
    background: -moz-linear-gradient(top,  rgba(255,255,255,1) 0%, rgba(241,241,241,1) 48%, rgba(225,225,225,1) 100%, rgba(246,246,246,1) 100%); /* FF3.6+ */
    background: -webkit-gradient(linear, left top, left bottom, color-stop(0%,rgba(255,255,255,1)), color-stop(48%,rgba(241,241,241,1)), color-stop(100%,rgba(225,225,225,1)), color-stop(100%,rgba(246,246,246,1))); /* Chrome,Safari4+ */
    background: -webkit-linear-gradient(top,  rgba(255,255,255,1) 0%,rgba(241,241,241,1) 48%,rgba(225,225,225,1) 100%,rgba(246,246,246,1) 100%); /* Chrome10+,Safari5.1+ */
    background: -o-linear-gradient(top,  rgba(255,255,255,1) 0%,rgba(241,241,241,1) 48%,rgba(225,225,225,1) 100%,rgba(246,246,246,1) 100%); /* Opera 11.10+ */
    background: -ms-linear-gradient(top,  rgba(255,255,255,1) 0%,rgba(241,241,241,1) 48%,rgba(225,225,225,1) 100%,rgba(246,246,246,1) 100%); /* IE10+ */
    background: linear-gradient(to bottom,  rgba(255,255,255,1) 0%,rgba(241,241,241,1) 48%,rgba(225,225,225,1) 100%,rgba(246,246,246,1) 100%); /* W3C */
    filter: progid:DXImageTransform.Microsoft.gradient( startColorstr='#ffffff', endColorstr='#f6f6f6',GradientType=0 ); /* IE6-9 */
}

/** collapse module **/
div.mod.collapse div.inner {
    display:none;
}

.myfooter {
    clear: left;
}

.bodytext {
    padding-left: 4px;
}

.galleryFlow {
    position:relative;
}

.swap {
    /*transform*/
    -webkit-transform:scale(0.5,0.5);
    -moz-transform:scale(0.5,0.5);
    -ms-transform:scale(0.5,0.5);
    -o-transform:scale(0.5,0.5);
    transform:scale(0.5,0.5);
    position: absolute;
    top: 0px;
    right: 0px;
}
You can go ahead and start the application. You’ll see both real-time data for GitHub and Twitter. We’ll be adding more mojits with more data in the coming modules, so you may want to review the sections on YQL.
Troubleshooting
Cannot call method ‘get’ of undefined
If you cannot access your model, you probably have forgotten to include the mojito-models-addon. Just add the addon to the requires array in your controller:
}, '0.0.1', {requires: ['mojito', 'mojito-assets-addon', 'mojito-models-addon']});
Cannot call method ‘getData’ of undefined
If you can access your model, but can’t call a method in your model, you either tried to access a model (module) that doesn’t exist or a method that doesn’t exist. Make sure that the {model_name} in the expression ac.models.get({model_name}); is correct and that the method exists. The is the prefix of the model file name: ..
Cannot find module ‘simple-twitter’
This generally means that you forgot to install the simple-twitter module. Make sure the package.json file has the following and then run npm install from the application directory:
"dependencies": {
  "mojito": "0.7.x",
  "simple-twitter": "~1.0.0"
},
Summary
In this module, we covered the following:
- models
- YQL
- calling model methods from the controller
- make REST calls with the Http addon
- using Node.js modules in your Mojito application
Q&A
Does Mojito support the push model of data to the client?
Currently, no. You push data to the client to initially render the page, but thereafter, binders or new HTTP requests only can get new data. We’ll see how to use binders to request new data in 7. Mojito on the Client.
Does Mojito have addons or an API to use a local database?
Mojito does not have any native database solutions, but there is nothing preventing a developer from using a Node.js modules such as mysql for a MySQL database or mongodb for a MongoDB database.
Test Yourself
Questions
- How do you access models from a controller?
- What are the four arguments passed to the methods of the REST module?
- What is the recommended way for getting data in Mojito applications?
- How do you use Node.js modules in the controller of a mojit?
Additional Exercises
- Create an additional model for your Twitter mojit that returns dummy tweets. Call the getData method of your new model when the Twitter API returns an error.
- Create an additional mojit that gets data with the model using YQL.
Terms
- YQL
- An SQL-like language for querying Internet data and the Web service that fetches data and returns it to clients.
- YQL Tables
- XML files that define the data source, keys, pagination options, authentication/security options, and any other information needed by the YQL Web Service to fetch data.